Entries in Stick to Your Ribs (15)

Monday
Jul252011

German Inspired Potato Salad

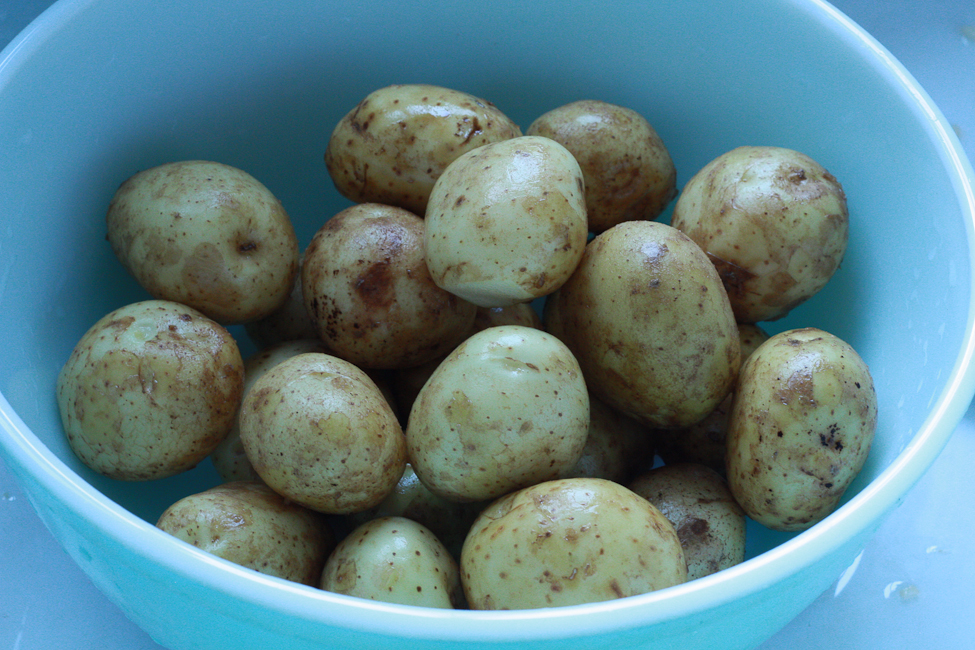
It is new potato time of year here. Those of you to the south and west of us here in Nova Scotia may be thinking, ‘what, it’s been new potato time for a while now Leah, wake up.’ Really though, they are just getting plentiful here.

I truly believe that there is not much finer than a new potato smothered in a healthy amount of butter and salt and pepper. There are occasions, however, when something a little bit more composed is called for. There are also occasions when getting half of supper done ahead of time is a nice treat as well.

I thought, for the odd day when it is actually warm enough that you don’t want to cook, that this makes a nice change to the mayonnaise doused potato salad that is a summer staple and which I love. Sadly, my behind and hips love it too much. So, to lighten things up we had this the other day.

Sometimes, I might be inclined to add some bacon, nicely crisped, to this. There were two reasons I didn’t on this occasion. The first, that there was already beef, bangers and  chicken going on the barbecue and the bacon just seemed excessive. For the second, you should reread the previous paragraph and, as with the first reason, the bacon just seemed excessive.

People may say that this should be served warm, and they would be correct. It is very nice warm. If you would rather go to the beach until supper time, I think it is perfectly acceptable to make it ahead of time and, if you really want to have it warm, put it in a heatproof bowl on the warming rack of your barbecue while everything else cooks. It is, cold or hot, a very fine potato salad.

German Inspired Potato Salad (Warm or Cold)

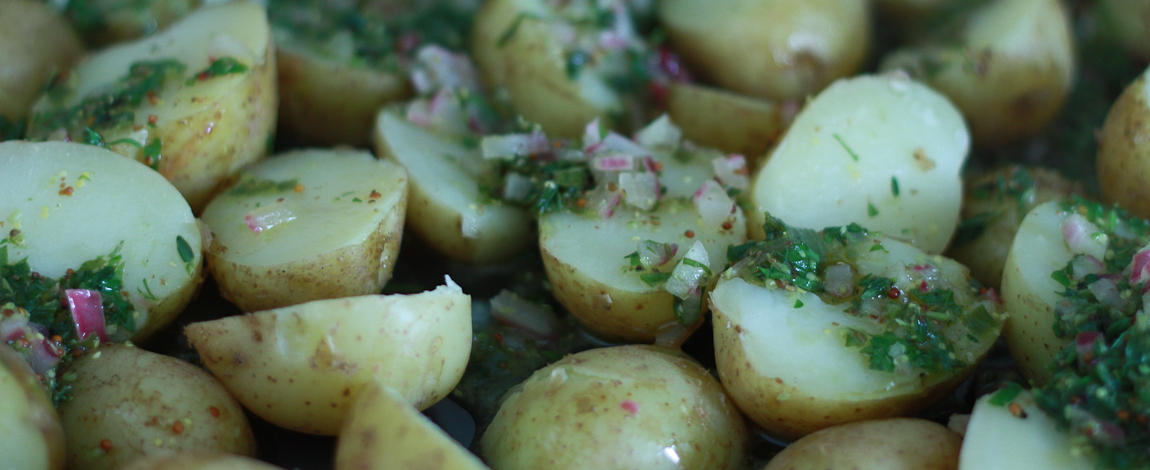
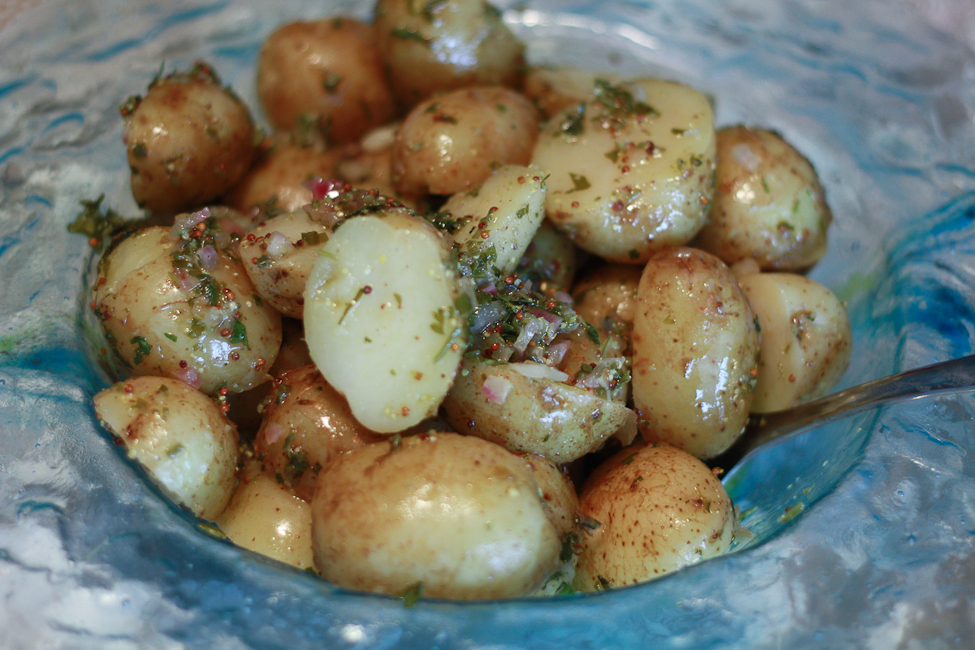
2 pounds small new potatoes halved
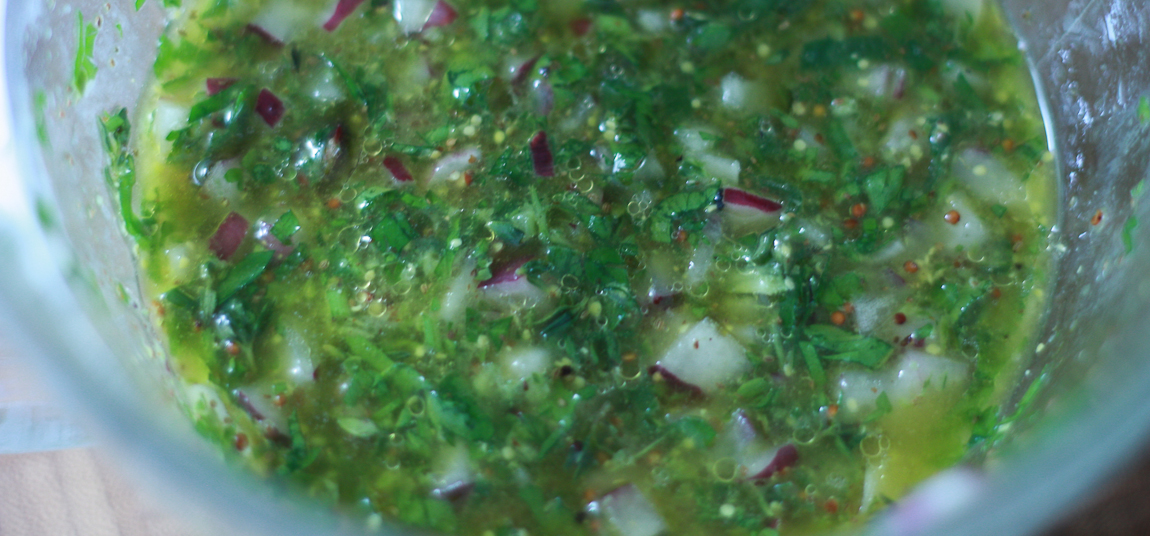
Vinaigrette

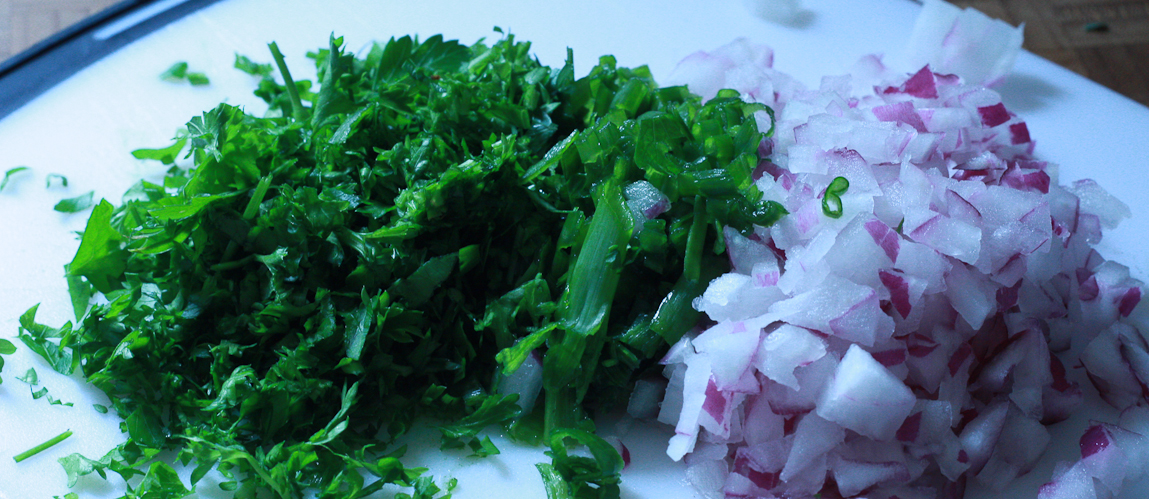
1/4 red onion finely chopped (about 1/2 cup)

1 tablespoon mustard

2 tablespoons white wine vinegar

1/4 cup olive oil

1/2 cup chicken stock

1/2 teaspoon salt

1/8 teaspoon celery seed

1 teaspoon fresh thyme leaves

2 tablespoons green onion finely sliced

1/2 cup chopped parsley (a handful)

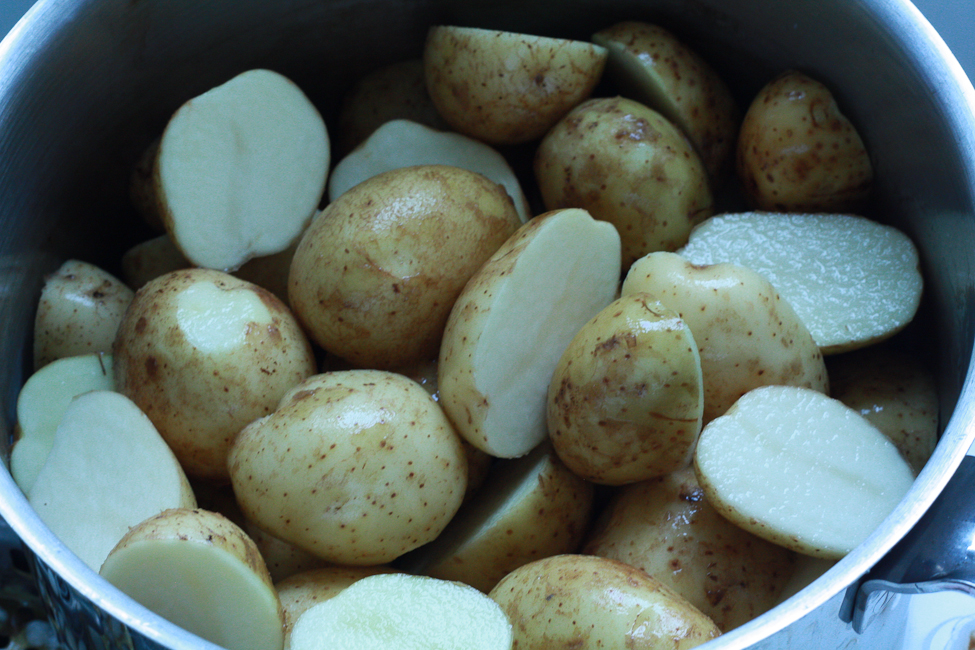
In a medium pot, cover potatoes with water and bring to a boil, reduce heat to allow a gentle boil and cook until just tender. It is important not to overcook them. It will take about ten minutes, once they are boiling

Meanwhile, mix all the ingredients for the vinaigrette together.

When the potatoes are cooked, drain them well and transfer them to a baking tray.

Heat the vinaigrette in a small pot just until it boils. Remove from heat and gently pour over the potatoes. After a few minutes, gently turn the potatoes, making sure the vinaigrette coats them completely.

Cool, or don’t, and serve.


Wednesday
Jun082011

Seeded Brown Irish Soda Bread

While at work, my husband has the privilege of being cooked for and cleaned up after. There is a lovely Irish girl who keeps him from withering away. Her name is Janine.

From time to time, the girls and I are lucky enough to share the privilege with him. Janine puts up with my children under foot and the forty-six questions that get fired at her about exactly what ingredients are going where and why the stove moves and why the fridge doors are so heavy and why the galley is called the galley and how come she has to cook for the boys and why the bread needs to cook for an hour and why she chose to paint her toenails that colour and if she is going to wear a pretty dress later on and well, you get the idea. She not only puts up with them, she does so patiently and calmly and sweetly in moments when I would have lost any shred of cool I may possess by question four.

She made us some soda bread for lunch one day. Poppy and I decided we would try and reproduce her delicious loaf. We tried and it was good but I am thinking it may need an Irish hand to be as delicious as hers was. For the rest of us this will do just fine to be sure.

I toasted the sesame seeds and pine nuts and cooled them before adding because they taste even better that way.  The seed/nut combination is up to you. You could add pumpkin seeds or chopped nuts or whatever you feel like.

Don’t forget to cut a cross in the top which is not a religious symbol - I had thought it was. Janine says it just helps it rise evenly.

Seeded Brown Irish Soda Bread (adapted from Janine’s adaptation of Rachel Allen’s Brown Soda Bread in Bake)

225 grams (8 ounces) whole wheat flour

225 grams (8 ounces) all purpose flour

1 teaspoon salt

1 teaspoon baking soda

100 grams mixed seeds (I used sunflower, poppy, pine nuts and sesame seeds)

25 grams (1 ounce) butter

1 egg beaten

375-400 mL buttermilk

Preheat oven to 425º (220ºc). 

Mix all the dry ingredients together in a large bowl. Rub the butter in to the dry ingredients. Make a well in the center.

Whisk the egg and buttermilk together and pour most of the liquid into the dry ingredients. Using your hand like a scoop, bring the flour and liquid together, adding more liquid if necessary. The dough should be soft an not too sticky.


Turn out and bring dough into a round on a parchment lined baking sheet.

Cut a deep cross in the top of round.

Bake for 15 minutes. Turn heat down to about 390º (200ºc) and bake for another 30 minutes. The loaf will sound hollow when it is done.

Remove from oven and allow to cool.


Saturday
May212011

No Knead Olive Oil Pizza Dough - Kitchen Workhorse

Sometimes you happen upon something that makes your previous efforts seem like a colossal waste of effort. Years spent altering a bit of this and a bit of that, wondering which combination will be just right are looked back on as misguided and foolhardy. Now, I do know that life, and all it entails are about the journey, not about where you end up but, I have decided, that as far as pizza crust goes, we have arrived and reflection on the past will not be happening.

I have had a pretty decent pizza dough recipe that I have used for about twelve years. It makes a divine focaccia, which is really all about the olive oil and salt ratio. The pizza crust it makes, if your oven is hot enough and you are lucky enough to be using “00” flour, is pretty good. I have spent many hours kneading this dough, in all its flour combinations, trying to come out with just the right taste and bite. Rarely with overwhelming success and, when successful, rarely repeatable which I chalk up to our nomadic tendencies.

I like kneading bread, I love it in fact. I love it more when I have no one underfoot and something good to listen to, and by good I don’t mean Sharon, Lois and Bram. Under these circumstances, I don’t even mind the clean-up. It used to be a retreat, the morning bread making, hiding out in the galley before anyone woke and broke the silence. Sadly, or happily, these circumstances are pretty much a thing of the past and I look to simplifying, even if it means giving up on cheap therapy.

When I saw this recipe and heard about the the book it came from, Artisan Bread in Five Minutes a Day, like my friend Kate when I told her about it, said, ‘I don’t believe it.’ I still haven’t read the book but if this pizza crust recipe is anything to go by, it holds great promise.

I have made it with several different types of flour, all resounding successes. Our favourite is making it with all Speerville Mills Whole White flour. It has a great crunch and a nice toastiness on the crispier bits. The half white bread flour, half whole wheat was really good too. I wouldn’t go more than 50% whole wheat personally but to each his own.

I know what I am about to say will leave pizza purists reeling. Don't get me wrong. I love perfect pizza. I have been lucky enough eat it here and here and here repeatedly (I apologize for the music). I spent four months working in and out of Naples and when in Rome, er, I mean Naples, you do as the Neapolitans do. I also think that when you are not in Naples and you don't have a 200 year old oven or family tradition to carry on, you can use a little license.

We have been topping pizzas with everything and have discovered fruit pizzas. The first was a caramelized shallot, fresh mango and brie number with a bit of fresh chive that was scrummy. The next, a few days later, was the same caramelized shallots, apple and cheddar and I think I almost liked it better simply because the apples held a slight crunch.

The girls are loving their pizza bianca. Our version is a smear of garlic scape pesto with feta or cheddar. It’s also so good with spinach and artichokes.

While we haven’t been, and don’t, eat pizza everyday, this dough is great because a batch makes enough for about five or six thin crust pizzas. You can divide it after it rises and put it in bags in the fridge for up to twelve days. I am sure it would freeze really well but, I have to admit, we haven’t had to yet.

Tell me, what is your favourite pizza topping. Are you a traditionalist? Can you stomach pineapple? What’s your most adventurous?

Olive Oil Dough from Artisan Bread in Five Minutes a Day

Makes enough for five to six thin crust pizzas (about 4 pounds of dough)

2 3/4 cups warm water

1 1/2 tablespoons active dry yeast

1 1/2 tablespoons salt

1 tablespoon sugar

1/4 cup extra virgin olive oil

6 1/2 cups flour (be adventurous)

In the bowl of a stand mixer, if you have one, or a large mixing bowl, mix the water, yeast, salt, sugar and olive oil together.

Mix in the flour until it all comes together.

Turn into a large bowl and cover, I use cling film because I know it will reach the top of my bowl. If your bowl is big enough, use a damp tea towel.

Let rise at room temperature until it falls back on itself (it rise so much that the bubbles burst and it collapses), or until it flattens on top.

Use immediately or divide, if you want, and refrigerate for up to twelve days, or freeze.

If you freeze it, although I haven’t tried, thaw it in the fridge without opening the bag or container.

Prepare it as you would your usual pizza.

Sunday
Apr172011

Chocolate Paté - Happy Birthday Pops!

My dad’s birthday is today. He is turning 60. 60 years young, he would say. My dad has taught me some pretty valuable lessons in the past few years.

He has taught me the value of being unconditional with those you love. I missed that for a long while. Along with that came learning the value of being loved unconditionally. He has taught me that sometimes it is okay to give in and to admit that you can’t do it all. He has taught me that it is okay to receive and that sometimes just being thankful is enough. He taught me that we don’t always have to agree to have a relationship. He has taught me that even when we haven’t seen each other or spoken in an age, that there is always someone who will listen and enjoy or talk and disagree or just say, ‘thanks for sharing that.’ He has taught me that I am stronger than I think I am.

He has taught my daughters a few things too. They have learned that he is a little crazy sometimes but that he loves them, even when they don’t want a bar of him and that that in itself is okay. He has taught Poppy how to drive, the windshield wiper controls and horn being an integral part of those lessons. His alter-ego, Stewart Martha, has taught them how clean a floor should be to eat off of. Most importantly so far, for them, he has taught them that chocolate is a food group on its own and that, when part of a meal, one should always eat it first so as not to spoil it by the lingering flavours of anything else or, heaven forbid, by not having enough room at the end of a meal. 

With that in mind, the girls and I set out to make what is potentially my dad’s favourite food, chocolate paté. I have made it for him before, in various guises. I once put some dried sour cherries in it which were eaten, but to his mind were definitely not proper, interfering with what was meant to be a chocolate experience. The nuts were greeted in much the same way. White chocolate would be unthinkable and milk chocolate is just about tolerable. 

Finding the recipe we would use became a challenge but I eventually happened upon a Bernard Callebaut recipe which, with a few tweaks was going to be just fine. I omitted the white chocolate layer. I kept the milk chocolate layer because the dark chocolate I was using needed a sweet lift for this to really be perfect, and so that my children would eat it. I normally make a baked, in a water bath, chocolate paté which uses eggs but it also uses 1 1/2 pounds of chocolate and makes a ton. It was not an eating challenge I felt the girls and I could, or should, take on. A big plus was the simplicity of this recipe. Sometimes you just can’t be worrying about temperatures and timing and with this, in three hours you have something amazing.

What came out was a little lighter than a usual paté but no less chocolatey for it. The Just Us chocolate I used was perfect. The dark gave a smoky depth and the milk chocolate had a caramel note that was the perfect foil for the barely sweet dark. I macerated some raspberries, which means I added some sugar and let them sit for a bit, and served it with that and some white chocolate sauce. You could do that or purée the berries and pass them through a sieve to remove the seeds for a finer presentation. With white chocolate or not is up to you as well. Some like it served with a dollop of whipped cream. In Cornwall, it would have a blob of the ubiquitous clotted cream. Really, I think, anything goes.

The only note on the method I would like to add is that of you stop to take photos, distribute evenly sized spoon licks to onlookers or otherwise faff about during the folding in of the cream, you too will likely end up with some tiny little chips of chocolate in your paté. They taste great but don’t help in the achieving of a silky smooth texture.

With all that, Happy Birthday Dad/Papa! 

Chocolate Paté (adapted from Bernard Callebaut)

200 grams good quality milk chocolate chopped

200 grams good quality dark chocolate chopped (try for at least 70%)

3/4 cup unsalted butter 

2 cups (500 ml) heavy (whipping) cream

Line a 22 x 11 cm loaf pan with cling film.

Melt each of the chocolates separately in a double boiler. When melted add 1/4 + 1/8 cup butter (1/2 of what the recipe calls for) in each, stir until butter is melted. Remove from double boiler and heat and let cool to room temperature.

When chocolate mixtures are cooled, whip cream to soft peaks. Divide evenly between the two chocolates and gently fold the cream into each chocolate.


Spoon the milk chocolate mixture into the pan, tap gently to, hopefully, get rid of any big bubbles and smooth top. The do the same with the dark chocolate layer.


Cover it with cling film and refrigerate for at least two hours.

Carefully unmold by gently tugging on the cling film lining the tin and invert it onto a plate.

With a hot knife (put the knife in a container of hot water for a few seconds), slice the paté.

Put slices on a plate and serve with some macerated raspberries or raspberry coulis and/or some white chocolate sauce.


Wednesday
Mar022011

Hummingbird Cake 

A little less than a year ago, the girls and I had the honour of attending a very special third birthday party. There were all the usual birthday party requirements including friends and family and games and a pinata. There was lots of party food including three cakes made by three generations of the birthday girl’s family.

One of the cakes had been made by her great grandmother, the traditional chocolate. One was made by her mom. And one, made by her grandmother, was her mom’s favourite. Coconut, not traditional as far as I know but I add it, and pineapple, bananas and nuts combine with cream cheese icing to make a cake far more delicious than the most perfect of carrot cakes or the moistest of humble banana muffins.

We said goodbye to this bright spark of a three year old recently on a grey day in a little church in a beautiful hamlet when I can only imagine the rainbows and sunshine and butterflies and fairy dust that were being sprinkled down on that space in the world; this little girl who has touched the lives and hearts of friends and family and so many people she didn’t even know. She has certainly caused me to cuddle my girls a little tighter and to give thanks for my blessings. Her mama has inspired me to be a stronger, more courageous person and to pack as much joy into every minute with my children as I can possibly muster.

I got back to San Diego and decided that I would make a Hummingbird Cake. I don’t have Mama B's recipe, nor could I even imagine mine would be as good but the thought of a certain little three year old eating it is food for the soul.

Hummingbird Cake (adapted from Joy of Baking)

1 cup toasted unsweetened shredded coconut (you can gently toast it in a pan over low heat, just keep an eye on it)

1 cup chopped pecans

3 cups all purpose flour

2 cups granulated sugar

1 teaspoon baking soda

1/2 teaspoon salt

1 teaspoon ground cinnamon

3 large eggs

3/4 cup vegetable oil

2 teaspoons vanilla extract

1 1/2 cups finely chopped fresh pineapple (yes, fresh, tinned pineapple gives me itchy hands)

2 cups mashed banana

Preheat oven to 350º. Butter and flour two 8 or 9-inch cake pans.

Mix dry ingredients together.

Beat wet ingredients together.

Mix wet and dry ingredients together and pour into pans.

Bake for about 40 minutes, until a tester inserted comes out dry. It may be a bit quicker for 9-inch pans, a bit longer for 8-inch.

Let cool on a cooling rack.

Split layers, if you feel like having four layers. I do because I like to pack a little more frosting in there. If not, just use the two. Trim the tops of the layers, before splitting, if they are uneven.


Frost with cream cheese frosting, recipe follows.

Cream Cheese Frosting

1 1/2 cups soft, room temperature butter

1 pound (450 grams, 16 ounces, 2 blocks) room temperature full fat cream cheese - Don’t even try it with the light kind, not only will it not taste as good, it will be a runny mess. Really, just don’t do it.

2 teaspoons vanilla extract

1 1/2 cups icing sugar

1/4 - 1/3 cup milk

Cream butter. Add cream cheese and cream together until smooth. Add the sugar and vanilla extract and beat until incorporated. Add milk, by the tablespoonful, if the frosting is too stiff. Add just as much as you need to for the frosting to be a nice consistency for icing the cake, think buttercream.


Sunday
Jan092011

Good Luck Lentils

It’s the New Year. I was thinking all about how well it was going. There were lots of happy, uplifting stories like this and this and this. I was smiling.

Then this happened, which infuriated me in the it is easier to buy a gun and ammunition than it is to buy beer kind of way. Later on, I watched this and I thought the world is really, seriously going to hell in a hand basket and what happened to Happy New Year and all that.

It is a few days, alright nine or so, past New Year’s Day but I turned the clock back at our house and we are going to eat lentils, lots of them.

Italians eat lentils on New Year’s day and in the new year. They eat them in hopes of money and good fortune. And let’s face it, the money sure would be nice but the good fortune part? It’s essential.

Good Luck Lentils with Fennel and Chard

1 large onion, finely chopped

5 large cloves garlic minced

Fennel - I had five sweet little bulbs - you should have about 1 cup chopped stalks and 1 cup julienned bulbs

1 cup diced carrots

1 bunch chard chopped

1 cup lentils- I used De Puy but you can use brown or green. I wouldn't use red though. I was going to use black beluga lentils which are awfully pretty but not always to hand.

3 tablespoons olive oil

3 cups stock (chicken or vegetable)

1 cup halved cherry or grape tomatoes (or diced tomato)

Few sprigs fresh thyme

Salt and fresh ground black pepper

Parmeggiano-reggiano shaved

In a large pot, sauté the onions, garlic, carrots and chopped fennel stocks with the olive oil until the onions are translucent. Stir in the lentils and the thyme.

Add the stock and bring to a boil. Reduce heat and simmer, uncovered, for about 20 minutes, until the lentils are almost tender.

Add the chard and the julienned fennel bulb. Cover and simmer for five minutes. Add the tomato and simmer for another three minutes. Season with salt and pepper.

Serve in bowls with a little drizzle of nice olive oil, some fennel fronds and some shaved parmeggiano. A nice chunk of crusty bread goes well here too.

Happy New Year - again!


Thursday
Jan062011

Man Bread

A while back we were passing through our local market one Sunday morning, trying desperately not to eat everything in sight. There was a woman promoting her new book and handing out recipe cards, which Poppy needed to have.

The card got filed in with the shopping. When we got home it got removed from the market bag, a little damp from something or other. I put the card in a catch everything basket on the counter. It stayed there for a couple weeks. Then, in a flurry of tidying up, it got put in a drawer.

I remembered the card and started a little search for it which turned into a frustrating and exhaustive tidy up and sort out of the drawer. There it was, finally, nestled between some cookie cutters and cupcake wrappers right up against the last six weeks worth of supermarket receipts and an empty package of throat lozenges.

It was a recipe aimed at men to promote a book aimed at men, insinuating that men need to eat different things than women, or at least cook different things. I am not sure. Regardless, it looked like this recipe could turn out well so Tilly and I made it.

The whole time, I thought about the man recipe thing and my thoughts turned to this. I realized that, at our house, the man drawer is mine. It is in the kitchen, it isn’t full of lightbulbs and batteries. It is full of piping tips that haven’t made it back into the case, clips and closures, thread and pens, chokey bits of toy hastily hidden from a curious baby and lots of random notes, recipes and clippings and it is full to spilling out. The kind of spilling out that takes a hip to shut it while you smooth the top layer down while carefully trying to extract your hands before you scrape your knuckles.

The man area at our house is very well ordered. Sure, there are some useless bits of junk and some empty wrappers but it is all tucked away in a quite carefully organised corner of the basement, so far from the bottom of the stairs that I only venture down there in the direst of cases. Safe from the clutter and mess of the rest of the house. A dark and peaceful little haven.

So, I did what I do and we made this man recipe an little trickier, if sautéing onions is tricky. And, I lightened it up using a lighter beer than it called for - the original called for a stout and I used Stone Levitation Ale, a hoppy little local number. I foofooed it up with the tiniest bit of oregano, dried because I can’t stomach fresh in any quantity. If my children weren’t eating it, I would have chucked it full of something spicy too.

The result was a loaf worth accompanying even the ladiest of winter pots. It is quick enough to make after a day out to go with whatever has been in your slow cooker all day. It is tasty enough to want to make more than once. It is really gorgeous toasted and would be pretty damn fine with some eggs and mushrooms.

Technically, it isn’t Man Bread, it is Anybody Bread. Unfortunately, this means you’ll have more competition getting a slice.

Cheddar Onion Beer Bread adapted from a recipe by Susan C. Russo

3 cups all purpose flour

1 tablespoon baking powder

1 teaspoon salt

1 1/2 tablespoons sugar

1 cup grated cheddar cheese, I used a 2 year old number

1 cup sautéed onions, cooled

A few grinds of fresh ground black pepper

1/4 teaspoon dried oregano

12 ounce (350 mL) flavourful ale of your choice

Preheat oven to 400ºF. Butter an 8-inch x 4-inch loaf pan.

Mix dry ingredients together in a large bowl. Stir in cheese. Stir in onions.

Pour beer in and mix all ingredients until combined.

Pour into prepared tin.

Bake for around 40 minutes. When a tester comes out clean, it is done.

Cool for a few minutes before slicing.

Enjoy.

Monday
Dec272010

Pre-Resolution Pennies

A few days ago, I found myself channeling my inner 1950’s housewife, the one with the perfectly starched, immaculately clean apron and not a hair out of place. Not the one I more closely resemble, with no apron and floury wet handprints on my butt - the result of a misplaced towel, and hair that resembles that Hallowe’en wig in the bottom of your dress up trunk but with the added dimension of whatever your child ate for breakfast smeared on one side and toothpaste in the ends of the other. It’s a glamorous job I do.

I was tidying up the cheese drawer, trying to make some space for all the cheese we need to have for Christmas. There was a chunk of prematurely purchased Christmas stilton that needed using up and, maybe it is because I have been trying to be so good and not eat such things lately, the thought of the best way to make cheese more fattening came to mind. I needed to make cheese pennies. You know, the ones you have eaten at least a dozen of before you can say, ‘A moment on the lips...‘. 

Ours would be stilton cheese pennies and we would throw some nuts in and then they would be very delicious with some port, the port you need to have because it is Christmas. You know, to go with all the cheese.

It’s not a new idea. It has been done way more than once, usually called Stilton Shortbread or Stilton and Walnut Cheese Dubloons or something else to make them sound all fancy. And, even though they are but humble cheese pennies, I can see why people try to give them this exalted status with flowery names. They certainly didn’t make it to Christmas Day here.

I managed to save enough to include in our Christmas goodie bags we were making for some friends but the daughters ran off into a corner with a handful nicked off the cooling rack. Stephen then discovered the container I had carefully hidden them in after a bike ride home but before supper. It took all three of us to tear them out of his hands which ended in hysterics because the girls thought they were rescuing the pennies for their own consumption. 

I didn’t use any dry mustard or cayenne which the cheddar variety like. I did use a healthy dose of fresh ground black pepper which when baked just added a toasty little kick. The pecans add a really great crunch to the pennies.

These are really good to make in advance. You can leave the dough in the fridge and just slice and bake before you need them. They also keep very well in an airtight container at room temperature after baking.

You really need these. Maybe as a foil to your New Year’s Eve tipple. I encourage you to enjoy them soon, before all your resolutions kick in and you can’t.

Stilton and Pecan Pennies

1 generous cup crumbled stilton

1/2 cup butter (if you use salted, don’t add salt, if you use unsalted, add the salt)

2 cups all purpose flour

1/2 cup chopped pecans

1/4 teaspoon salt

Fresh ground black pepper to taste

Mix all the ingredients together and add cold water by the tablespoonful until the dough just holds together (I used 2 tablespoons).

Divide the dough in two. Roll each half into a log about 1-inch in diameter and wrap in clingfilm. Chill for at least a couple of hours.  

Preheat oven to 400ºF.

Slice in 1/4-inch rounds and arrange on a parchment lined baking sheet. Bake for about 12 minutes or until they are golden on the bottoms and edges.

Cool and try not to eat all at once.