Entries in Celebrations (12)

Tuesday
Sep272011

Mabel Murple's Purple Maple Syrple

Mabel Murple ordered breakfast

She had purple eggs on toast

And when she ordered dinner

She had purple short rib roast

Mabel Murple cooked a supper

Murple’s super duper purple stew

It was served with purple ketchup

And Mabel’s maple syrple too!

(Mabel Murple’s purple maple syrple!)

  -Sheree Fitch, Mabel Murple

One of our favourite books of late has been Mabel Murple. Whether it is Sheree Fitch’s infectious rhyme, Sydney Smith’s perfectly purple illustrations or the simple fact that they get to shout, ‘UNDERWEAR’ at the end, the girls love it. If we miss reading it one day, it is read twice the next. 

One day, during an early morning reading, the breakfast demands were made. They didn’t just want pancakes, they wanted them with Purple Maple Syrple. So, donning my indulgent mother cap, I leapt out of bed and got on with it.

You can buy this stuff in stores. It usually comes in tiny bottles. Around here they are often tied with Nova Scotia tartan ribbon which, maybe, is supposed to make it okay to pay THAT MUCH for 100mL of syrup. We go through this stuff, and maple syrup generally, by the bucketload. For us, this proves a little more economical despite missing the ribbon. And, you can make it in about as much time as it takes to whip up a batch of pancakes anyway. (I think I can feel the wrath of the value-added maple syrup industry coming down on me now)

This was some time ago, blueberries weren’t quite in season and I was still in the midst of using up the frozen winter’s berry stash. You can easily use fresh, the last of them are still trickling through markets, and I have since. Still perfectly purple.

Mabel Murple’s Purple Maple Syrple inspired by Mabel Murple written by Sheree Fitch

2 cups blueberries (fresh or frozen, washed and de-stemmed, preferably)

2 cups maple syrup

Bring the berries to a boil over low to medium heat. Don’t let them burn. Add the maple syrup and return to a boil.

Strain through a sieve, pressing to extract all the liquid. Or, leave it chunky if you don’t mind the bits.

Serve over pancakes, french toast, waffles, porridge, ice cream, yogurt...


Allow to cool before refrigerating in a clean, dry container.


Monday
Jul042011

Roasted Raspberry Meringue Tart or How to Use up all Your Frozen Berries

As you may or may not know, I have a little thing for a certain food and travel magazine. The pictures, the articles, the recipes are all exactly how I want to cook every single day. You may or may not also know that, having spent a winter away, my craftily squirreled away stash of summer fruit is still largely intact. 

Summer fruit is starting to come along here and I have been having a little panic about how to use up what I have. 

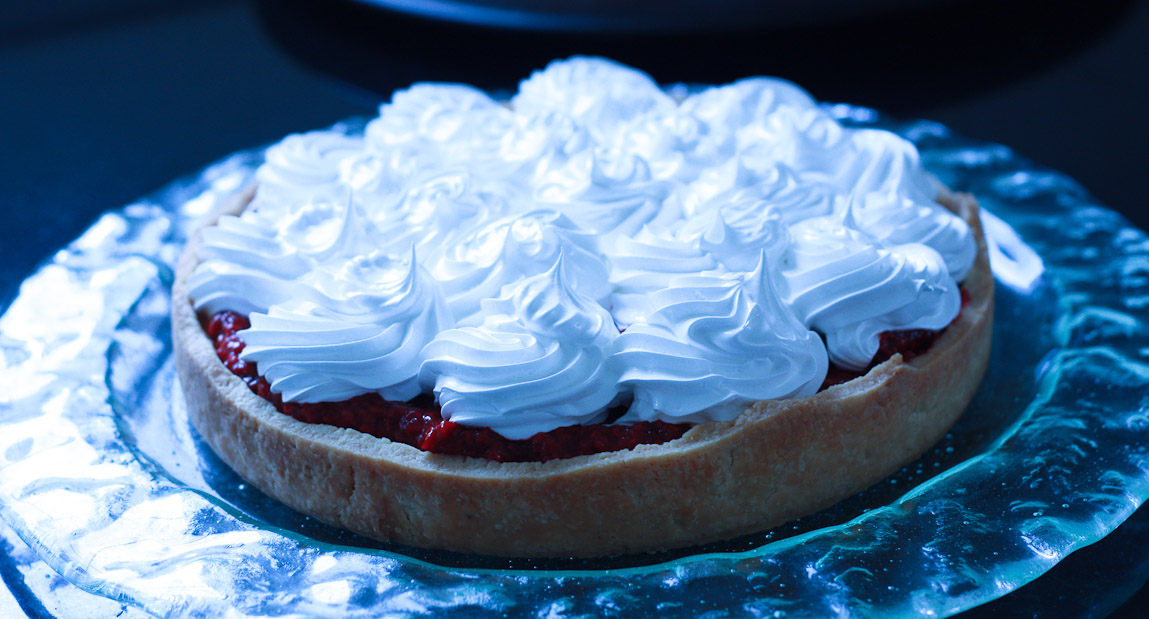
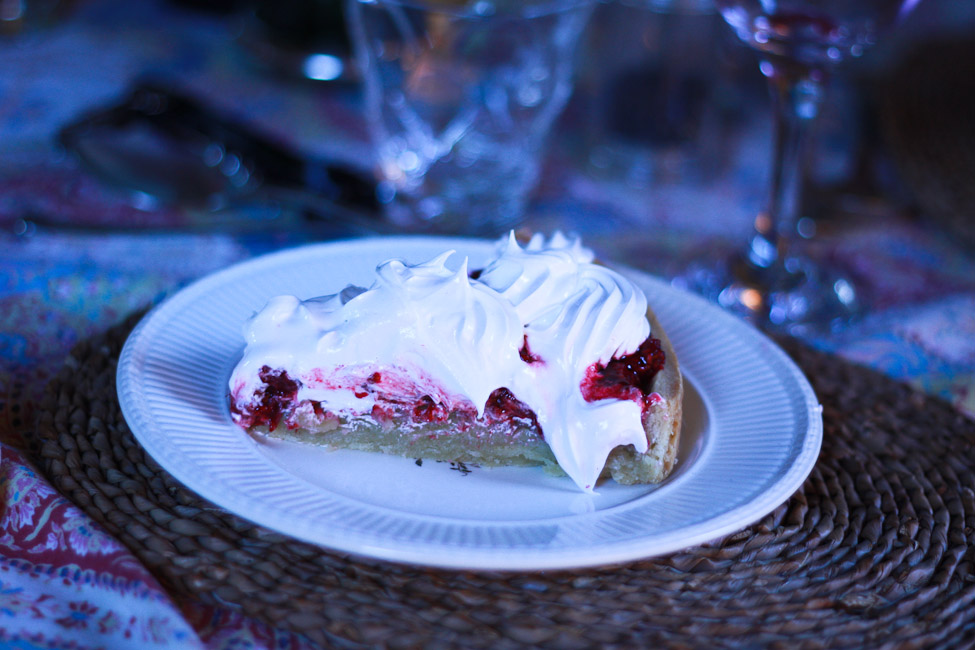
I also have been fancying a recipe for a Rhubarb and Raspberry Meringue Tart in a certain food and travel magazine since returning from San Diego to a stack of six issues. This graced the cover and has had Poppy oohing and ahhing over what she calls its marshmallow top since first spotted back in April.

So, while I love this magazine, I have to come to terms, on a monthly basis, with the fact that, depending on how you choose to look at it, I get it six months early or late because of Australia being in the Southern Hemisphere and all. I also have to come to terms with the fact that, upside down seasons aside, certain things are never going to be in season plentifully together here; things like raspberries and rhubarb.

Our tart would be plain raspberries, and I would roast them with some sugar and lemon and hope that it wasn’t a complete mush in the end. It was but it was damn tasty mush and it was really nicely tart so that the italian meringue, or marshmallow top, didn’t make an overly sweet pud. The frangipane makes a delicious little tart all on its own and topped with the berries alone would be a really nice little take on a Bakewell tart but the meringue, the oh-my-god meringue elevates the whole thing way beyond the humble Bakewell.

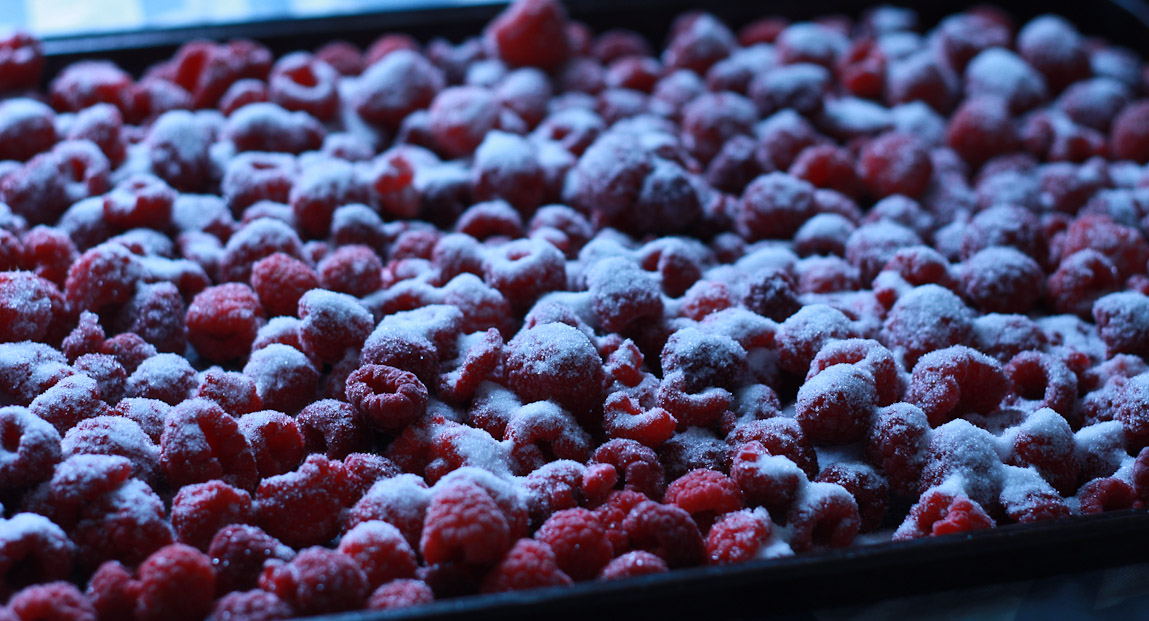
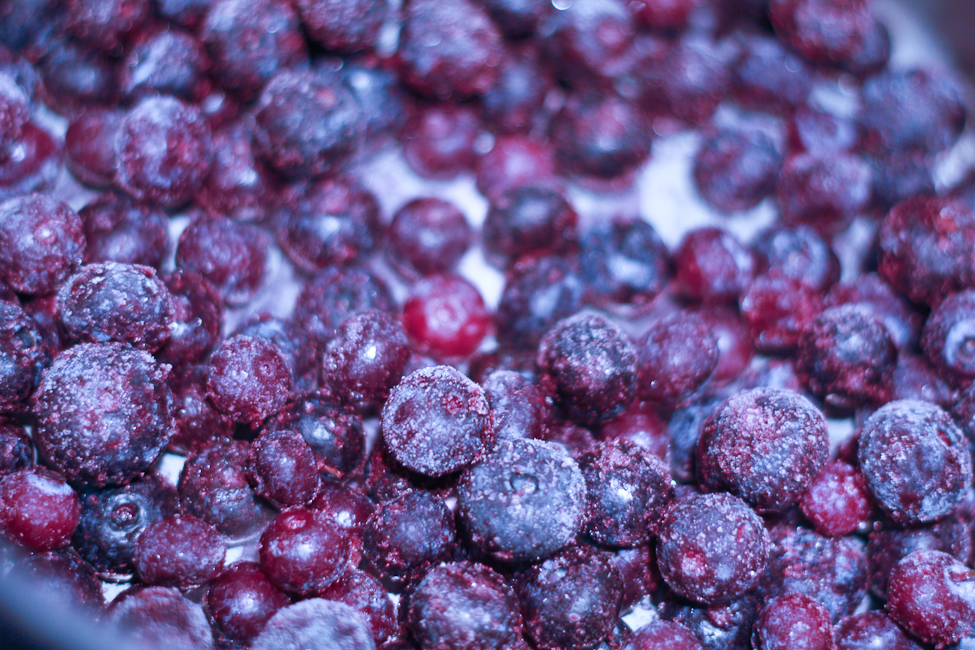
I used frozen raspberries and made a double recipe (two tarts) so I freed up a lot of freezer space. You can use fresh and it will be less jammy if you treat them gently. You may be able to reduce the ‘roasting’ time as well. If you are using fresh berries, you could skip the cooking altogether and make a little raspberry syrup or coulis, toss the berries with it and pop them on top of the frangipane. I think you would need to eat it pretty quickly in that case as well, not that that should be an issue.

This tastes really and truly delicious and it is so pretty that you almost don’t want to cut it. But do, because you will be happy and happy and happy.

I’ll apologize now because taking lots of process shots seems to have gone the way of sleeping past 6:30 am, showers and not asking a toddler whether they need to use the potty every twelve minutes.

Roasted Raspberry Meringue Tart adapted from Australian Gourmet Traveller

Pastry

180 grams softened butter

40 grams icing sugar

2 egg yolks

250 grams plain flour

Beat butter until pale, add sugar and stir to combine. Add the egg yolks and 1 tablespoon chilled water. Sprinkle flour over and stir to just combine. Knead a few times on a floured surface. Wrap in plastic wrap and chill in refrigerator (+/-1 hour).

Frangipane

75 grams softened butter

80 grams granulated sugar

70 grams almond meal (ground almonds)

1 tablespoon booze (the recipe originally called for brandy, I used Grand Marnier)

2 eggs

50 grams slivered almonds

Beat butter and sugar until creamy and pale. Add the almond meal, booze and eggs. Stir just to combine and then stir through the slivered almonds. Refrigerate to chill (+/- 1 hour).
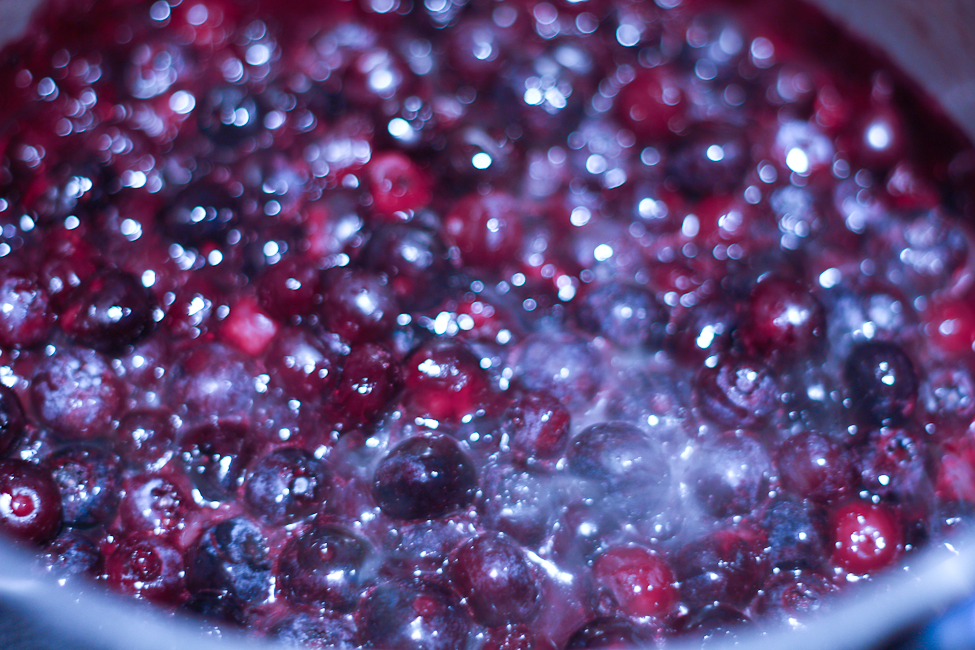
Roasted Raspberries

4 cups frozen raspberries (still frozen)

1/4 cup sugar (if you love sweet sweets then just bump the sugar up a bit here)

Finely grated zest of 1 lemon

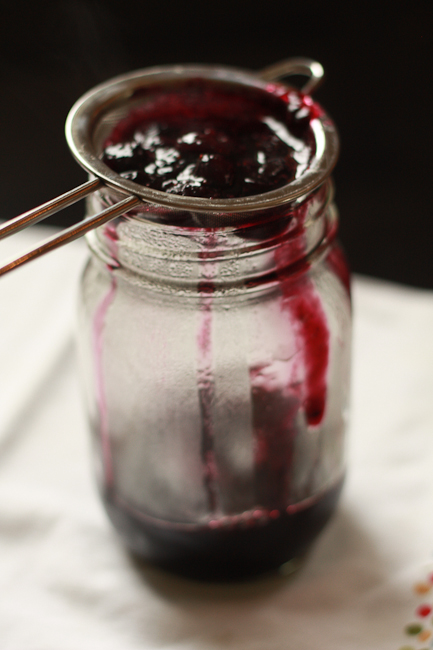
Preheat oven to 400º. On a large baking sheet, arrange berries. Sprinkle with sugar and roast until outer edges start to caramelize. Gently stir or toss berries and return to oven. When the edges start to caramelize again, remove from oven and allow to cool. Strain any extra juices off and save to serve. Gently stir through the lemon zest. Allow to cool.

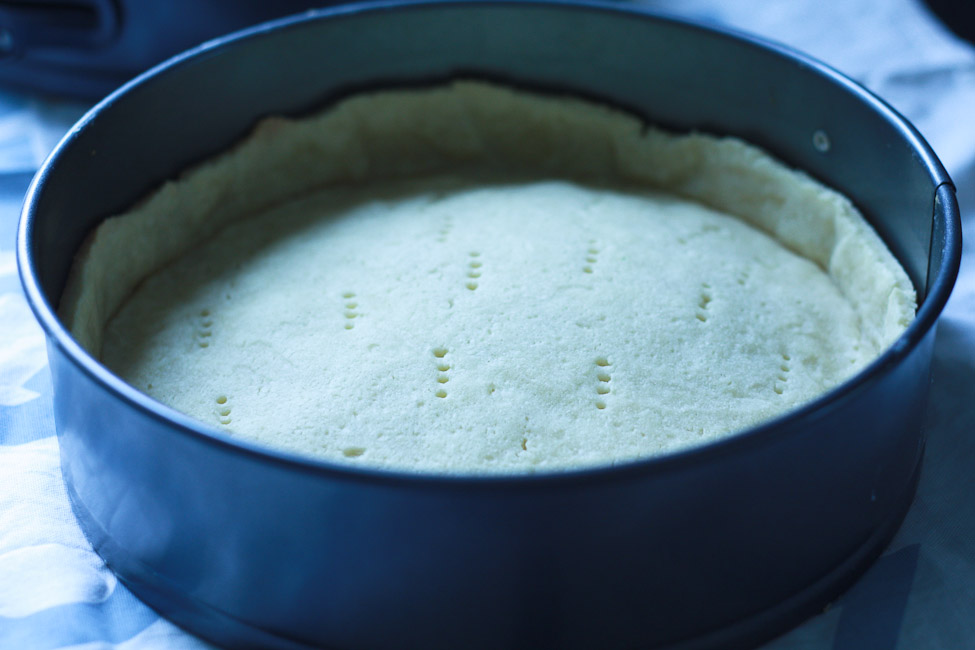
Roll out the pastry and line a 22 cm tin with a removeable base. I used a springform pan. Trim the edges and prick the bottom with a fork. Rest, in refrigerator, for one hour.

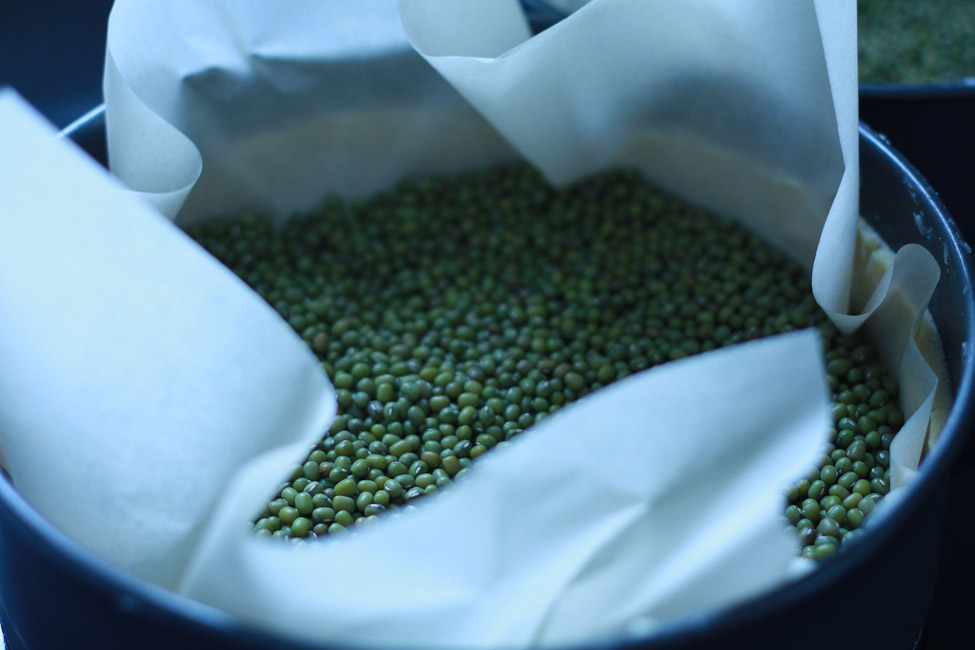
Heat the oven to 350º. Blind bake the tart case (line it with parchment and weigh it down with baking weights or some dried beans) for about 20 minutes, until light golden. remove the weights, or beans, and the parchment and bake for a further 10 minutes or until golden.


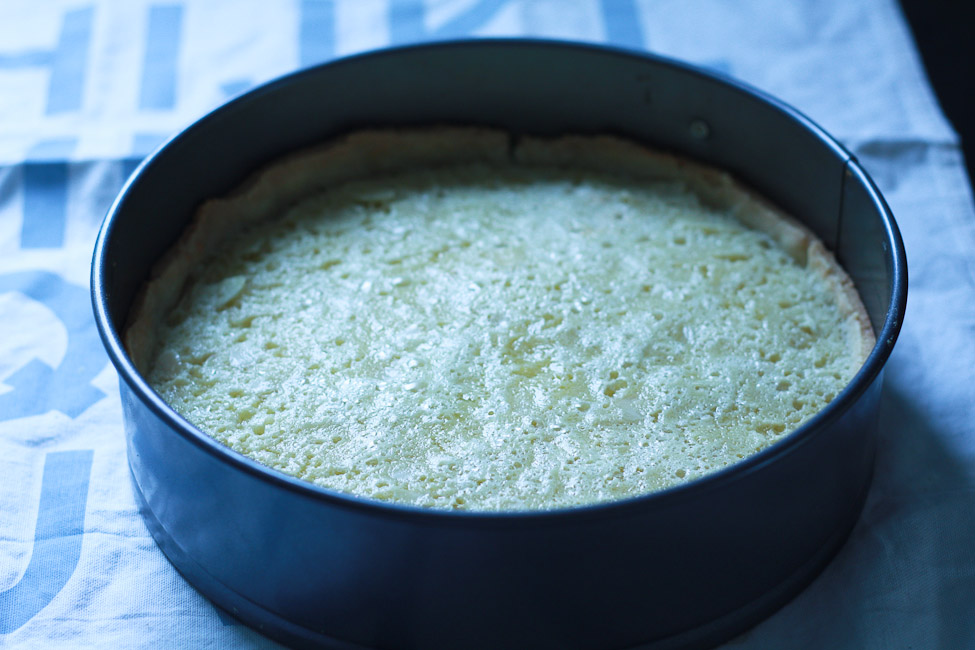
Spoon the frangipane into the tart case and bake until it is set and golden, about 15 minutes.

Cool just until firm and remove from tin.

Italian Meringue

175 grams granulated sugar

2 egg whites

Pinch of cream of tartar

In a small saucepan, add 60 ml of water to the sugar and heat gently until all sugar is dissolved. Increase heat and cook until temperature is 121ºc on a candy thermometer, this is pretty much the firm ball stage in the world of candy cookery. Meanwhile, beat the egg whites and cream of tartar until soft peaks form. Slowly drizzle the sugar syrup into the egg whites while the mixer is on and beat for 10-12 minutes until cool. The meringue will be glossy and firm.

While the meringue is whipping, spoon the raspberry mixture onto frangipane. Top with the meringue, pipe it if you have the means, otherwise a spoon and some swirls will be just perfect.

Serve drizzled with a little extra syrup if you like.

Wednesday
Jun082011

Rhubarb Ripple Ice Cream - Rhubarb Trilogy 2011 - Part II

Encouraged by David Lebovitz and his The Perfect Scoop, I have been making ice cream recently. I don’t love ice cream but I do have an ice cream maker which caused no small amount of post purchase depression. Consequently, I have fits and spurts of determination to use said machine.

Turning the pages and looking at perfectly scooped bowls of creamy indulgence, some beautifully swirled with bright fruit purées, I got to thinking about how uncommercial rhubarb is. Why is there no rhubarb ice cream next to the Black Raspberry Cheesecake and the Rum Raisin? I would stand up for the humble rhubarb and create the next ice cream sensation, Rhubarb Ripple.  

Instead of using the same recipe I have used for years for vanilla ice cream, I thought, since I was already reading it, I would use one from The Perfect Scoop. I followed the ingredient list perfectly and then forgot or didn’t bother to read the recipe instructions and carried on my way, happily ignoring the published directions and making it the way I would have made it anyhow. Regardless, it is perfect and delicious and not crazy sweet and the perfect foil for the rhubarb compote I was going to swirl through.

I would recommend, if you are really caught up in appearances, or taking pictures of your work for your blog, that while you split your vanilla bean, you watch what you are doing. Don’t watch your toddler scaling the kitchen cupboards or you will wind up with something like this.

Or, better yet, put down your knife and rescue your toddler from her tenuous toe hold on the edge of the drawer. In hindsight, you and your kitchen units will be happy you did.

Rhubarb Ripple Ice Cream (with some help from David Lebovitz and The Perfect Scoop)

Vanilla Ice Cream Base

1 cup (250 mL) whole milk

2 cups (500 mL) whipping cream

3/4 cup sugar

1 vanilla bean, split lengthwise

6 large egg yolks

Pinch of salt

Rhubarb Ripple

4 cups chopped rhubarb

1 cup granulated sugar

4 tablespoons (1/4 cup) lemon juice

Scrape out the seeds of the vanilla bean and add to a large saucepan with the milk, cream and sugar. Gently bring to a boil. Immediately remove from heat.


Beat egg yolks and pinch of salt in a bowl and slowly pour about a third of the hot cream mixture into the yolks, whisking all the time. 

Slowly pour the yolk mixture back into the pan with the remaining cream whisking all the time.

Return to the stove and over a low heat, stirring constantly, cook until the mixture coats the back of a spoon. You can test by running a finger through the mixture on the back of the spoon. It should hold the path left by your finger.

Pour the mixture into a bowl and chill.

Put the rhubarb, sugar and lemon juice in another medium saucepan and bring to a boil. Reduce heat and simmer, stirring occasionally, until the mixture is thick enough to hold a track in the bottom of the pan when you run a spoon through it. As the mixture thickens, you will need to stir it more frequently to prevent burning. It will be thick and syrupy and will measure just shy of 1 1/2 cups when it is properly cooked down.

Pour into a bowl and chill.

Freeze the ice cream base in an ice cream maker according to manufacturer’s instructions. If you don’t have an ice cream maker you can try it the way I explained here.

Put a large metal mixing bowl in the freezer to chill while the ice cream is freezing.

When the ice cream is frozen, transfer it to chilled bowl and quickly fold/swirl/gently stir about 1 cup of the rhubarb mixture in. You don’t want to fully incorporate it it, you want to keep the rhubarb in swirl or ripples. You also want to do this as quickly as possible to prevent as much melting as you can.

Immediately transfer to the freezer to set up again.

Commercial, it may not be but delicious, there is no question.


Wednesday
Jun012011

Sun, Sun, Beautiful Sun - Fresh Lemonade Syrup

We all ran around in shock on Sunday afternoon. A previously shy sun shone and we revelled in the joy/bedlam/disaster and noise of a dozen near five year olds.

In preparation for this moment, the sun shining for the first time in a month, I needed something delicious and thirst-quenching. Something a little sweet but not teeth-rotting. Something that tastes like sunny days, and I don't mean sunscreen and sandy hand mauled sandwiches. Pimm's No. 1 Cup, while perfectly fitting the delicious and thirst-quenching order, isn't perfectly suited to five year olds for obvious reasons. While the non-heavy machinery operating adults quaffed their Pimm's, those in charge of vehicles and the children would need to drink something else.

My grandmother used to make a lemonade syrup, the recipe was handed down and my mother made it for us. That was back in the day when I thought that a certain powdered beverage, often electric blue, to which you add sugar and water was the ultimate in cool person drinks. So, something as homemade as lemonade made from a syrup, which didn't get squeezed from a plastic container, was not something high on my street cred growing list.

Years pass and then the very same lemonade syrup, or one very similar, shows up at the summer market and it lights a little fire in the back of my brain and I get to thinking, this is probably much easier than summer market chappy is making it out to be with his 'secret recipe' and 'even more secret ingredient' chatter.

Turns out that it really is and after wading around on the internet in a 'there is how much sugar in that' eye-bulging anxiety attack, and with a very little experimentation, I came up with this and I think it is pretty good.


I like it to have the pulp left in, so I did. You could strain it but, I think, you'll be sacrificing lemony goodness. I suggest, if you don't have a self-straining juicer, to juice everything into a measuring cup and then strain the seeds out, you can push the pulp through with the juice.

This is just as delicious with some club soda and muddled mint leaves and heck, while you're there you may as well just chuck a little white rum or vodka in and celebrate the sunshine with a lemon mojito. Not that I would ever do anything like that.

Lemonade Syrup (makes about three pints)

3 cups sugar

1 cup water

1/4 cup lemon zest  

juice of 18 lemons (about 3 1/2 cups)

Bring sugar, water and lemon zest to a boil and let cool.

When cool, stir in lemon juice. Transfer to a clean bottle and refrigerate. 

Mix to taste.

Drink. 

Monday
May302011

The Bunting Cake

It was Big Daughter's 5th birthday recently. Due to maternal guilt over moving her around and taking her from her friends and depriving her of the comforts of home - come to think of it, I'm not sure if the deprivation is hers or mine - I went a little birthday preparation nuts.

While I barely slept for a week save for a few fleeting hours in between cutting out butterflies and crafting bunting flags from sugar paste, I did enjoy every minute. 


Despite the hat and the cold, Tilly even managed to enjoy herself for a minute or two.

I do need to mention that my sister, Kate, made the strawberries for my Cath Kidston inspired birthday cake which she and my mom made. I recycled them.

Tuesday
May102011

It's a Hard Life

In the past, you know those very few times I remembered to actually do it, Recipeless Wednesday was a photo and just a photo. While all this travel, as I have discovered, leaves little time for anything other than tea, I thought at least I could take pictures and tell you a bit about it. Luckily, the daughters and I have being very well cared for. Meals and laundry and comfy beds abound.

I could use a little more wi-fi access to the interweb, all available at the cafe down the road but the likelihood of accompishing anything other than a MacBook swimming in spilled hot chocolate is slim. My less optimistic visions of the mayhem involve Tilly jumping across the tables, lattes and cappuccinos spilling every which way as she shouts, 'Mine, mine, mine,' wielding a spoon reaching for the chocolate sprinkles of strangers and other terrified small children.

We started out on a high note, with our very own fashion dos and don'ts on Wills' and Kate's big day. We decided that hats are back unless, of course, they are really just nude coloured fancy Minnie Mouse ears. Not sure anyone could pull that/those off. All this royal telly watching with cups of tea to fuel the six am start.

Then we enjoyed an amazing day here where we, and our cupcake smeared gaggle of cousins, didn't venture past the dining room but, after a quick internet squizz, I am determined to go back for longer than an afternoon. We were treated to a Royal Wedding Tea Party complete with wedding cake and, more importantly, Pimm's. It was all served in idyllic English surrounds on a day straight out of July. After tea and cakes and little cucumber sandwiches delivered to the garden by icing-wired offspring, I almost couldn't bear the thought of returning to bathe and put to bed my children.

Then, there was more tea, and more cake, in the form of Annabel's Marmalade Cake, recipe and more children happily playing together while their mothers determined the best and worst dressed. I will post this in due time. I am starting to worry that this will become a blog about delicious things to eat with a cup of tea and, consequently, I'll need to let my trousers out.

Later that week, we had coffee with Rosie in Appleby. Her and her husband, Andrew, run The Courtyard Gallery. Stephen would have been most impressed with my restraint, Poppy's Deborah Hopson-Wolpe bowl almost got a mate and I could hear my cupboards crying out for Dartington pottery. Rosie makes the cakes for the gallery cafe so we were treated to a walnut cake and Tiffin squares and some other things that my children devoured before I got to try.

The next day we got to Cornwall, after a most stoic, if I may say so, eight hour car journey on my own with the girls. For that day, our gustatory experiences were enjoyed on a path of least resistance basis and somewhat limited by and to motorway service stations and coffee (lots of) with bribes of chocolate and sweets, like they hadn't been eating all that for the last ten days.

Crossing the Tamar, into Poppy's birthplace, as she'll all too readily explain, is a bit of a homecoming. It is our English home. Cornwall has brought us asparagus by the literal bucket load. Said asparagus gets itself drizzled in just shy of a bucket load of melted butter and a generous salt and peppering and calls itself supper. I have absolutely no problem with that.

Poppy has been begging for rhubarb, she has only had it once since we got here, and Eton Mess, that too has also only been had once. She has determined it is better than pavlova, it is essentially smooshed pavlova. Luckily for her, we managed to not get lost, stuck or drive the car into a hedge on some single track Cornish lanes leading to the farm shop where, as their sign four miles back promised, they had not only rhubarb, but fresh strawberries too.

We drove back to the grandparents' as fast as our out of practice Cornish lane navigating would allow and set about the yummiest of English puds and roasting our rhubarb. All the pictures and instructions to come in the first installment of 2011's Rhubarb Trilogy. All this, just as soon as I find some wi-fi.

Sunday
Apr172011

Chocolate Paté - Happy Birthday Pops!

My dad’s birthday is today. He is turning 60. 60 years young, he would say. My dad has taught me some pretty valuable lessons in the past few years.

He has taught me the value of being unconditional with those you love. I missed that for a long while. Along with that came learning the value of being loved unconditionally. He has taught me that sometimes it is okay to give in and to admit that you can’t do it all. He has taught me that it is okay to receive and that sometimes just being thankful is enough. He taught me that we don’t always have to agree to have a relationship. He has taught me that even when we haven’t seen each other or spoken in an age, that there is always someone who will listen and enjoy or talk and disagree or just say, ‘thanks for sharing that.’ He has taught me that I am stronger than I think I am.

He has taught my daughters a few things too. They have learned that he is a little crazy sometimes but that he loves them, even when they don’t want a bar of him and that that in itself is okay. He has taught Poppy how to drive, the windshield wiper controls and horn being an integral part of those lessons. His alter-ego, Stewart Martha, has taught them how clean a floor should be to eat off of. Most importantly so far, for them, he has taught them that chocolate is a food group on its own and that, when part of a meal, one should always eat it first so as not to spoil it by the lingering flavours of anything else or, heaven forbid, by not having enough room at the end of a meal. 

With that in mind, the girls and I set out to make what is potentially my dad’s favourite food, chocolate paté. I have made it for him before, in various guises. I once put some dried sour cherries in it which were eaten, but to his mind were definitely not proper, interfering with what was meant to be a chocolate experience. The nuts were greeted in much the same way. White chocolate would be unthinkable and milk chocolate is just about tolerable. 

Finding the recipe we would use became a challenge but I eventually happened upon a Bernard Callebaut recipe which, with a few tweaks was going to be just fine. I omitted the white chocolate layer. I kept the milk chocolate layer because the dark chocolate I was using needed a sweet lift for this to really be perfect, and so that my children would eat it. I normally make a baked, in a water bath, chocolate paté which uses eggs but it also uses 1 1/2 pounds of chocolate and makes a ton. It was not an eating challenge I felt the girls and I could, or should, take on. A big plus was the simplicity of this recipe. Sometimes you just can’t be worrying about temperatures and timing and with this, in three hours you have something amazing.

What came out was a little lighter than a usual paté but no less chocolatey for it. The Just Us chocolate I used was perfect. The dark gave a smoky depth and the milk chocolate had a caramel note that was the perfect foil for the barely sweet dark. I macerated some raspberries, which means I added some sugar and let them sit for a bit, and served it with that and some white chocolate sauce. You could do that or purée the berries and pass them through a sieve to remove the seeds for a finer presentation. With white chocolate or not is up to you as well. Some like it served with a dollop of whipped cream. In Cornwall, it would have a blob of the ubiquitous clotted cream. Really, I think, anything goes.

The only note on the method I would like to add is that of you stop to take photos, distribute evenly sized spoon licks to onlookers or otherwise faff about during the folding in of the cream, you too will likely end up with some tiny little chips of chocolate in your paté. They taste great but don’t help in the achieving of a silky smooth texture.

With all that, Happy Birthday Dad/Papa! 

Chocolate Paté (adapted from Bernard Callebaut)

200 grams good quality milk chocolate chopped

200 grams good quality dark chocolate chopped (try for at least 70%)

3/4 cup unsalted butter 

2 cups (500 ml) heavy (whipping) cream

Line a 22 x 11 cm loaf pan with cling film.

Melt each of the chocolates separately in a double boiler. When melted add 1/4 + 1/8 cup butter (1/2 of what the recipe calls for) in each, stir until butter is melted. Remove from double boiler and heat and let cool to room temperature.

When chocolate mixtures are cooled, whip cream to soft peaks. Divide evenly between the two chocolates and gently fold the cream into each chocolate.


Spoon the milk chocolate mixture into the pan, tap gently to, hopefully, get rid of any big bubbles and smooth top. The do the same with the dark chocolate layer.


Cover it with cling film and refrigerate for at least two hours.

Carefully unmold by gently tugging on the cling film lining the tin and invert it onto a plate.

With a hot knife (put the knife in a container of hot water for a few seconds), slice the paté.

Put slices on a plate and serve with some macerated raspberries or raspberry coulis and/or some white chocolate sauce.


Wednesday
Mar022011

Hummingbird Cake 

A little less than a year ago, the girls and I had the honour of attending a very special third birthday party. There were all the usual birthday party requirements including friends and family and games and a pinata. There was lots of party food including three cakes made by three generations of the birthday girl’s family.

One of the cakes had been made by her great grandmother, the traditional chocolate. One was made by her mom. And one, made by her grandmother, was her mom’s favourite. Coconut, not traditional as far as I know but I add it, and pineapple, bananas and nuts combine with cream cheese icing to make a cake far more delicious than the most perfect of carrot cakes or the moistest of humble banana muffins.

We said goodbye to this bright spark of a three year old recently on a grey day in a little church in a beautiful hamlet when I can only imagine the rainbows and sunshine and butterflies and fairy dust that were being sprinkled down on that space in the world; this little girl who has touched the lives and hearts of friends and family and so many people she didn’t even know. She has certainly caused me to cuddle my girls a little tighter and to give thanks for my blessings. Her mama has inspired me to be a stronger, more courageous person and to pack as much joy into every minute with my children as I can possibly muster.

I got back to San Diego and decided that I would make a Hummingbird Cake. I don’t have Mama B's recipe, nor could I even imagine mine would be as good but the thought of a certain little three year old eating it is food for the soul.

Hummingbird Cake (adapted from Joy of Baking)

1 cup toasted unsweetened shredded coconut (you can gently toast it in a pan over low heat, just keep an eye on it)

1 cup chopped pecans

3 cups all purpose flour

2 cups granulated sugar

1 teaspoon baking soda

1/2 teaspoon salt

1 teaspoon ground cinnamon

3 large eggs

3/4 cup vegetable oil

2 teaspoons vanilla extract

1 1/2 cups finely chopped fresh pineapple (yes, fresh, tinned pineapple gives me itchy hands)

2 cups mashed banana

Preheat oven to 350º. Butter and flour two 8 or 9-inch cake pans.

Mix dry ingredients together.

Beat wet ingredients together.

Mix wet and dry ingredients together and pour into pans.

Bake for about 40 minutes, until a tester inserted comes out dry. It may be a bit quicker for 9-inch pans, a bit longer for 8-inch.

Let cool on a cooling rack.

Split layers, if you feel like having four layers. I do because I like to pack a little more frosting in there. If not, just use the two. Trim the tops of the layers, before splitting, if they are uneven.


Frost with cream cheese frosting, recipe follows.

Cream Cheese Frosting

1 1/2 cups soft, room temperature butter

1 pound (450 grams, 16 ounces, 2 blocks) room temperature full fat cream cheese - Don’t even try it with the light kind, not only will it not taste as good, it will be a runny mess. Really, just don’t do it.

2 teaspoons vanilla extract

1 1/2 cups icing sugar

1/4 - 1/3 cup milk

Cream butter. Add cream cheese and cream together until smooth. Add the sugar and vanilla extract and beat until incorporated. Add milk, by the tablespoonful, if the frosting is too stiff. Add just as much as you need to for the frosting to be a nice consistency for icing the cake, think buttercream.