Entries in Cheese (6)

Monday
Jul112011

Grilled Nasturtium Leaf Wrapped Halloumi

In the Mediterranean, things like grape leaves abound. Fresh on the trees, in tins and jars, you would be hard pressed to find a culture that doesn’t use them for some form of cooking.

Here on the South Shore of Nova Scotia, the grape leaf, in any form, is a rare thing. It is the stuff of specialty grocers not located on the South Shore for the most part. So, in an effort to make do and to use what grows here and to justify the panic purchase of my four nasturtium baskets, I am determined to use as much of them as possible.

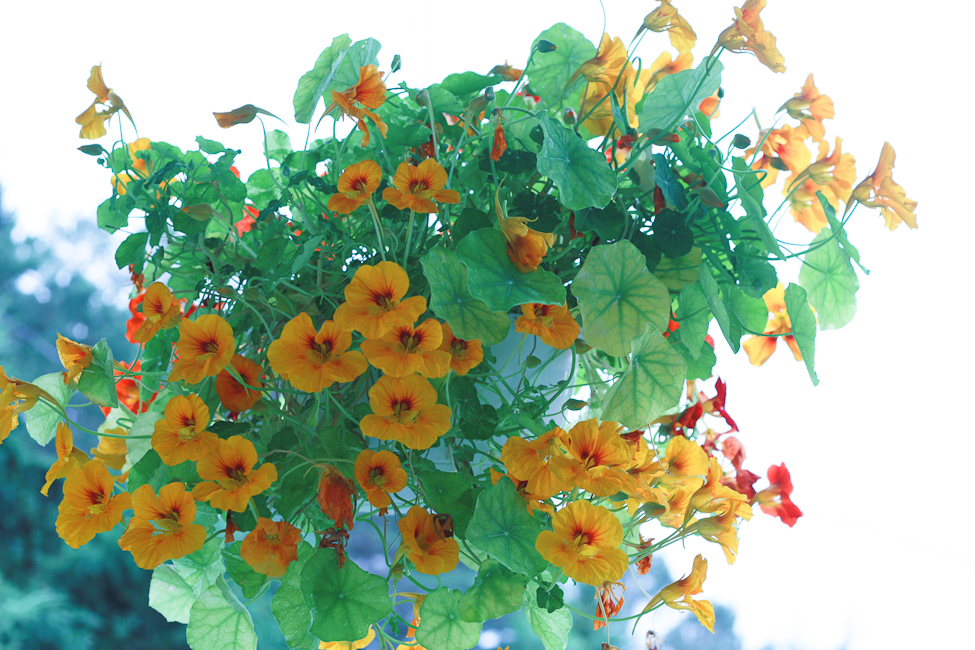
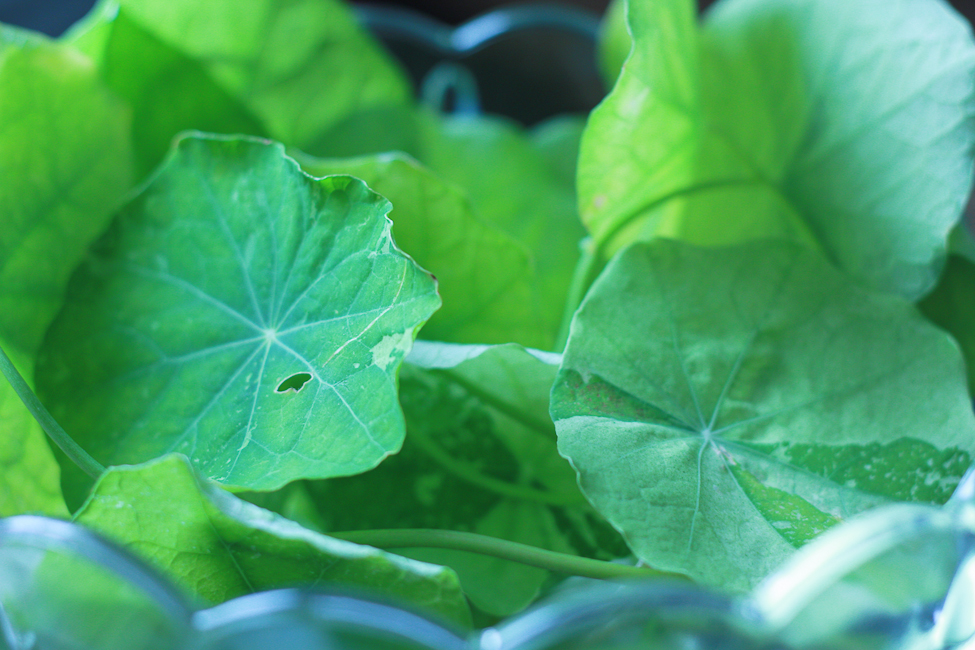
The seeds are going to get pickled, just as soon as I collect enough of them to fill a jar. The flowers get tossed into salad or used to decorate supper. The leaves are very delicious in salad and where you would use lettuce, especially in an egg sandwich. With such a proliferation of leaves though, I needed a new use.

I was googling around for some suggestions and I saw a recipe for nasturtium leaf dolma. Having eaten the little parcels all over the Eastern Med, I couldn’t face making a lame attempt at copying them and being disappointed. I did, however, recall that I had a piece of halloumi cheese in the fridge and got to thinking that wrapping the cheese before grilling it would be kind of well, kind of delicious.

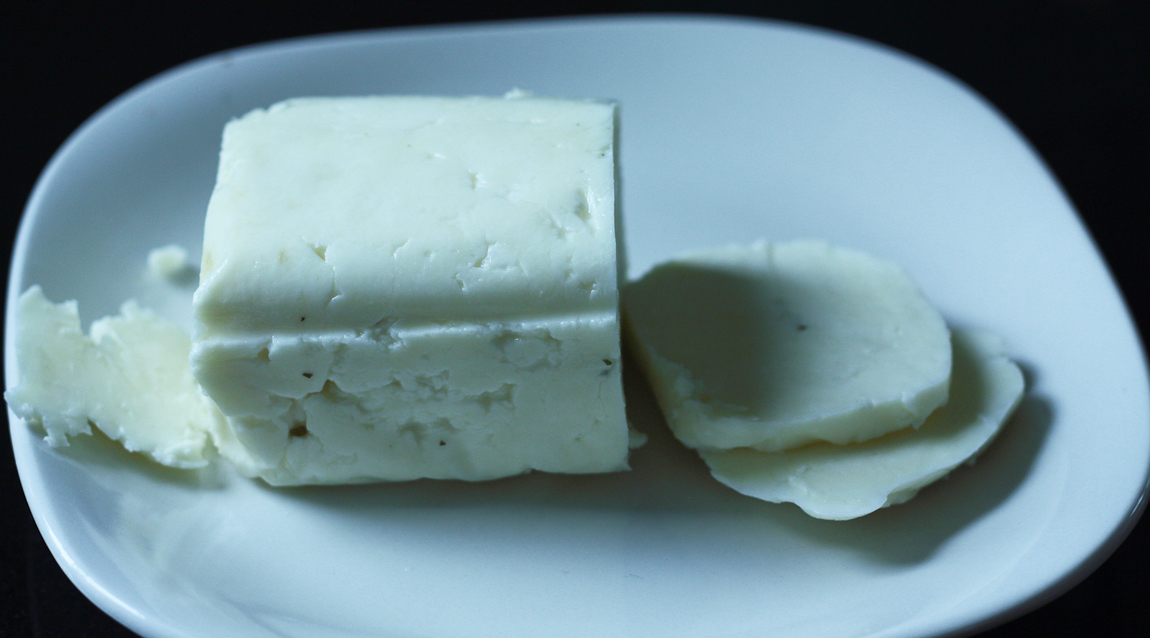
Before you start thinking this is going to ruin your barbecue, it isn’t. Halloumi cheese does not melt the way most cheese does. It is a sheep and goat milk cheese traditionally made on Cyprus. It has an almost squeaky texture which, I admit, does not sound that nice but it is. Really, it is. Because it is made from heated curds, it has quite a high melting point and it grills, fries and flames up beautifully.

I am not going to ask you to flame it here, it is a practice not for the faint of heart or those unequipped with the appropriate safety equipment, read extinguishers and fire blanket. All you have to do is wrap it in some quickly blanched leaves and toss it on the grill with whatever is up for supper.

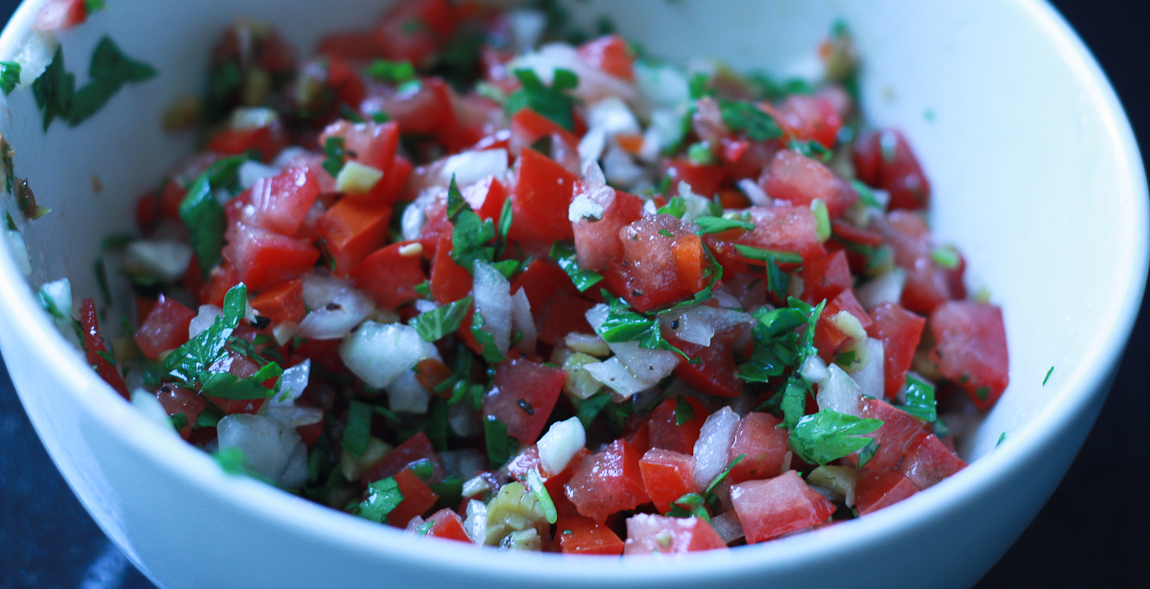
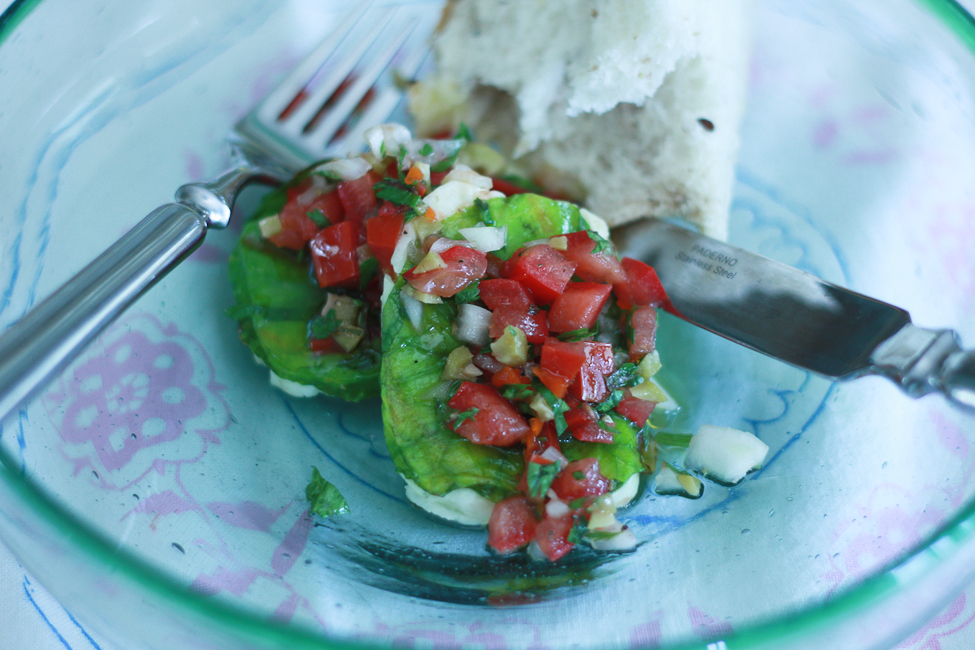
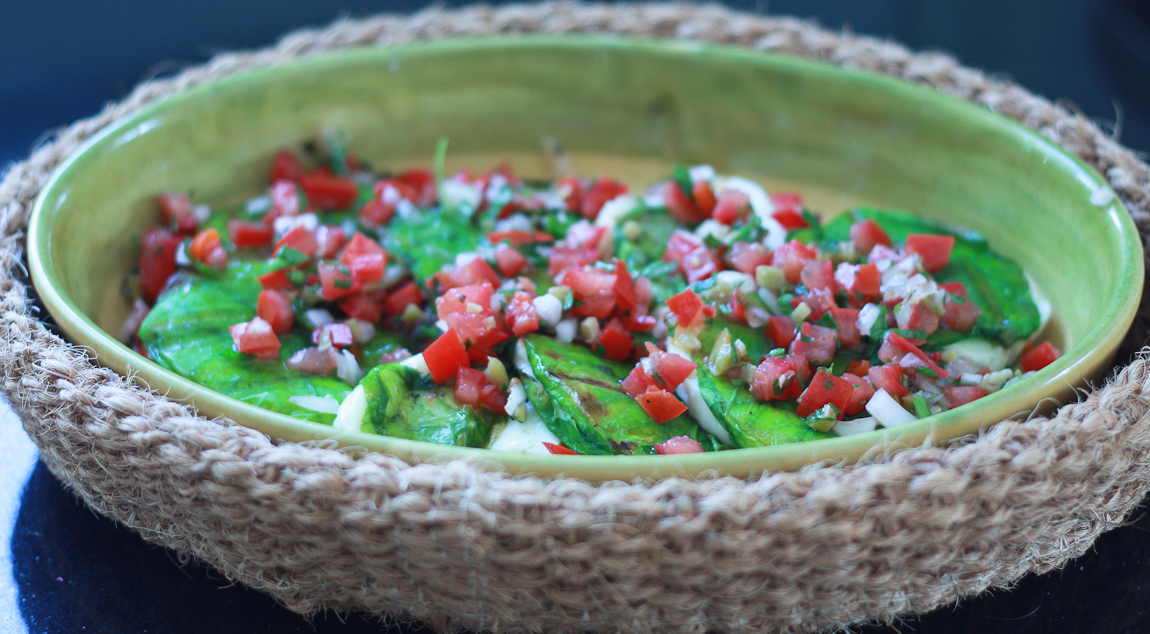
Poppy painstakingly made, with a table knife and a little bit of help in the interest of spped, a not-so-greek green olive salsa fresca to eat it with. It makes for a really light summery side or a quick starter plate.

Nasturtium Grilled Halloumi with Green Olive Salsa serves four as a light side or starter

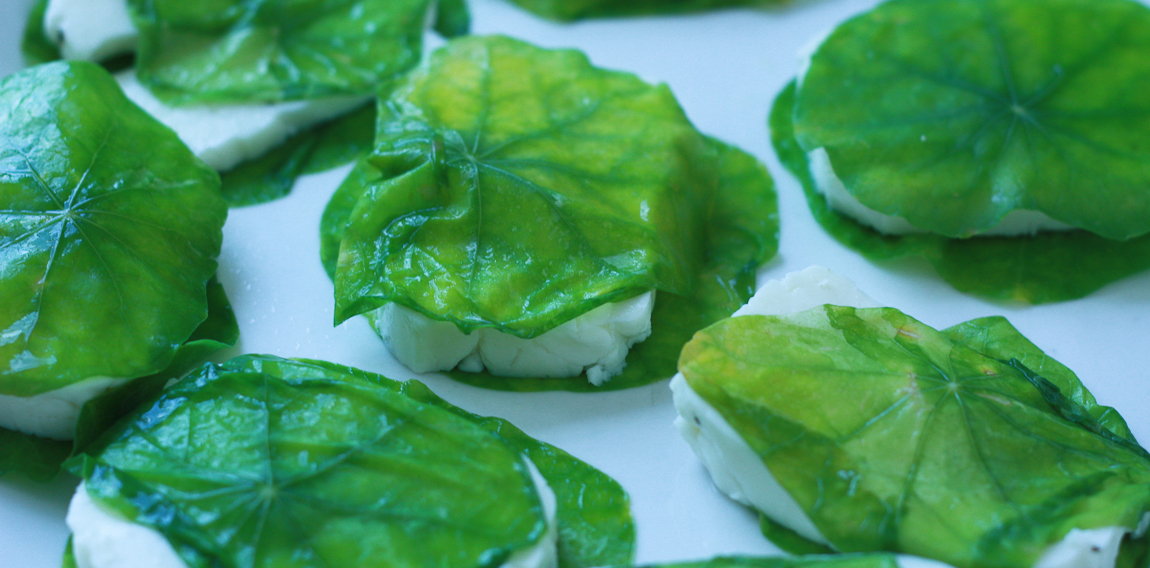
16 nice big nasturtium leaves

8 1/4-inch slices halloumi cheese

Cracked black pepper

1/2 tablespoon olive oil

4 roma tomatoes

1/4 medium sweet onion finely diced

2 tablespoons green olives finely chopped

1 tablespoon white wine vinegar

1 tablespoon olive oil

1 tablespoon chopped fresh parsley

Salt and pepper

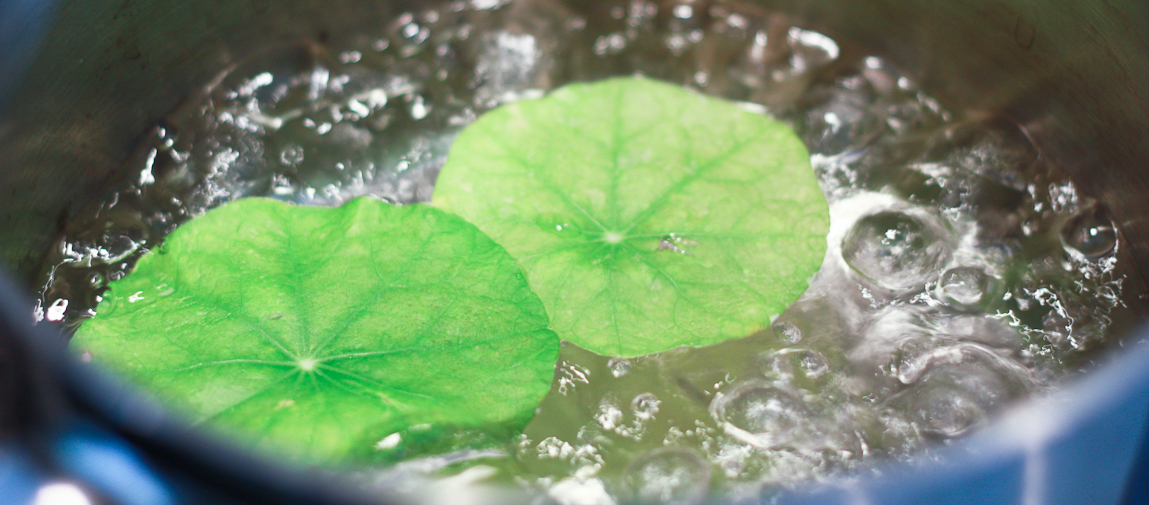
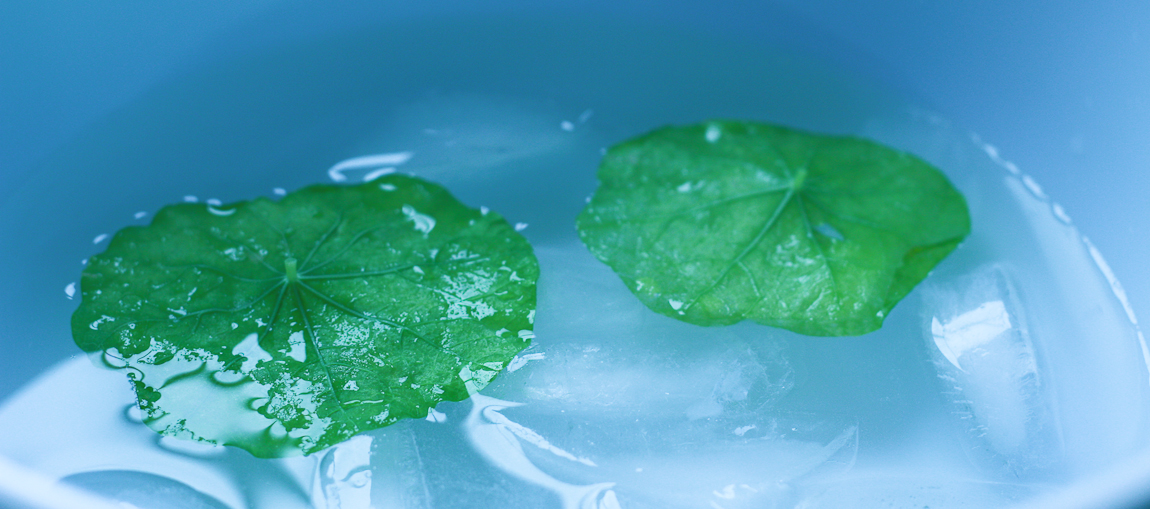
Bring a pot of water to the boil. Make an ice bath by filling a bowl with ice and water.

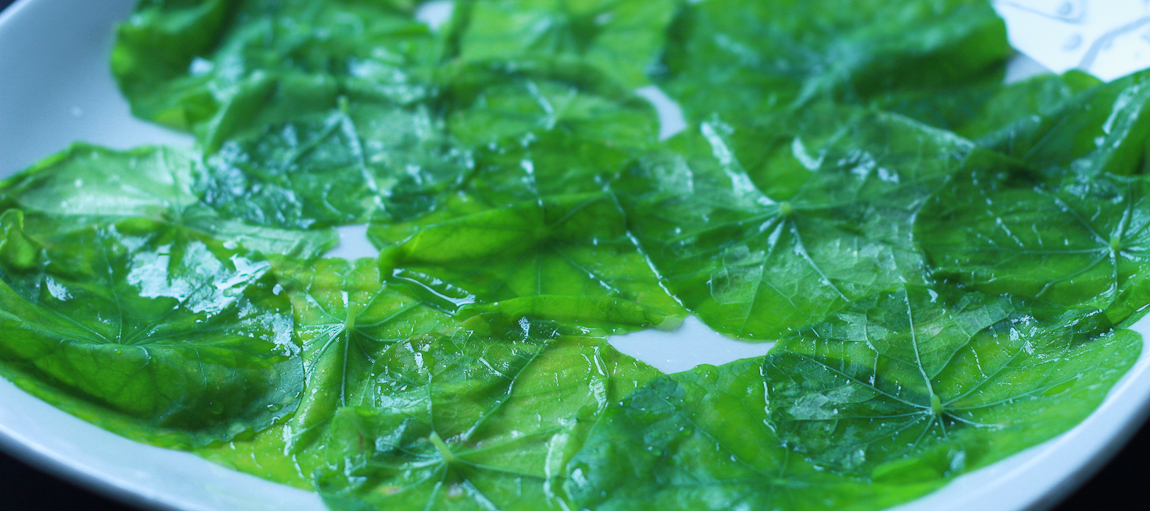
Drop the nasturtium leaves, a few at a time, into the boiling water. After a few seconds, the leaves will darken. Gently transfer the leaves to the ice bath for a few seconds. Gently dry them on a clean towel and place them on a plate until you are ready to use them. Repeat until all the leaves are finished.

Remove the seeds from the tomatoes and dice them. Toss with the onion, olives, vinegar, olive oil, parsley and lightly season. Set aside.

Place each slice of halloumi on top of a nasturtium leaf, sprinkle with pepper and top with another leaf. Brush, very lightly, with olive oil.

Heat the barbecue and make sure the grill is clean. When the grill is hot, reduce heat to medium and gently place each slice on the grill.

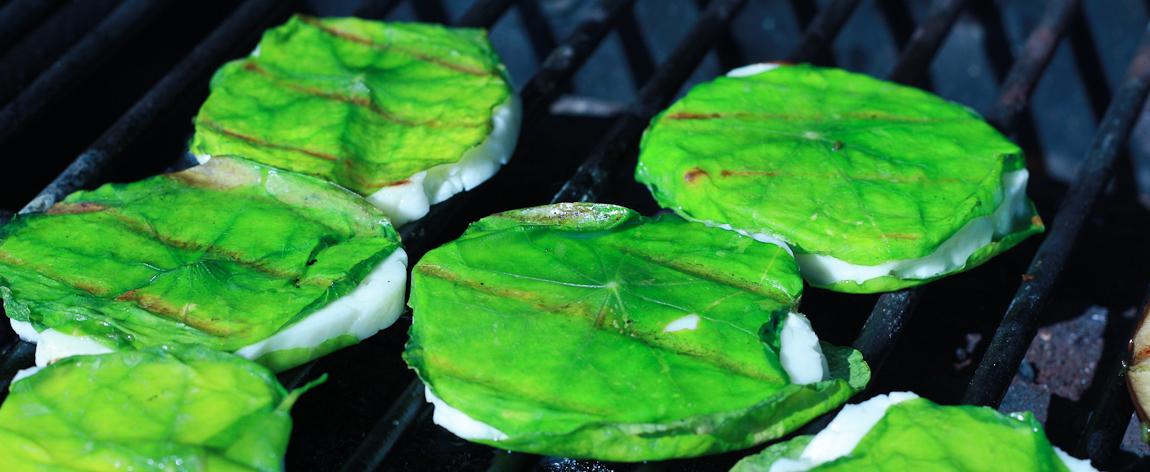
After one to two minutes, or until grill marks are visible, flip the slices and grill for one to two minutes.

Transfer to a dish with some of the salsa on the bottom, spoon the remaining salsa over the top and drizzle with some extra olive oil if desired.


Wednesday
Jun082011

Rhubarb Chutney - Rhubarb Trilogy 2011 Part III

This post could easily have been called God’s Gift to Grilled Cheese. It isn’t though. That would mean that I think that chutney is just for grilled cheese sandwiches. I don’t. However, I do believe that grilled cheese sandwiches with chutney are one of the best things ever.

It is rhubarb time, as you know. It gets to the end of rhubarb season and, while I really, really love rhubarb, I start to wonder what to do with it besides making ice cream, crumble, sorbet, roasting it, making cheesecake with it, chopping it up and putting it in the freezer and so on.

This recipe makes just four cups but you could easily double or triple it if your canning and preserving sense has kicked in this early in the green season. If, like me, your’s hasn’t, this will keep in the fridge for at least a month. And, since it is barbecue season as well, you should have it used up in no time since you will need something for all those chops and sausages.

This is very uncomplicated and I wanted to keep the rhubarb taste there, as much as you can in a chutney anyway. I almost started adding some orange zest and cinnamon and stopped myself because this is summer chutney. We can talk about heavier, spicier chutneys at the end of the green season, right? 

This has a tiny bit of heat and a decent ginger kick. You could nicely freshen it up with some fresh cilantro/coriander and a little squeeze of lime just as you put it on the table with your grilled offering. With cheese, or grilled cheese, is it good just as it is.

Rhubarb Chutney

5 cups chopped rhubarb

2 cups diced onion

2 tablespoons minced fresh ginger

1 teaspoon ground coriander seed

1/4 teaspoon dried chili 

1 1/2 teaspoons salt

1 1/2 cups brown sugar

1 cup cider vinegar

Put all ingredients in a large pot. Slowly bring to a boil.


Reduce to a simmer. Simmer, stirring occasionally, until the mixture has thickened and the liquid stops running in to the spoon tracks when you stir. This should take about 40 minutes.

Towards the end of the cooking, as the chutney thicken, you will need to stir more often.

Remove from heat and transfer to clean, dry jars. If you are ‘putting it up,’ you should process the jars in your canner for about ten minutes.

Your grilled cheese will never be the same again.

Thursday
Feb032011

Rainbow Bread Pudding (almost)

The other day, over at sweet salty, Kate said I was all rainbowy. Well, not me exactly, but my house. And, I am pretty sure she was referring to what we eat and not how we decorate. At least I hope that is what she was saying. 

Well, just as she was saying that, I went and posted this. Then I read what she said and felt all embarrassed and immediately wanted to post something cleaner and brighter, more orange and green, good for the body as well as the stuck in the depths of February soul.

Problem was, we were in no fit state for contact with the general public. We were at the stage of the cold when trying to wipe away the green nasal discharge (am I really talking about this in a post about food? Yes, but I am going to blame it on the fever.) creates shrieking one could easily associate with murder by chainsaw. That and the fact that I could not bring myself to put pants, and by pants I mean trousers, on let alone shoes, jacket, find the car keys (yes, I know the supermarket in less than a block away), load two children into their car seats, etc, etc. This meant that we were cooking with what we had.

We get squash in our CSA, and while I don’t dislike the lovely little orbs, I don’t love them either. It takes a bit of motivation for me to get excited about cooking them up into something good. Luckily, Kate had asked for orange, and since I had a few of these little pumpkin cousins sitting around here, I could do orange.

I could do green, well I guess it is greeny white but greenish anyway. I had some leeks and green onions. I had a slightly stale loaf of bread that hadn’t become the sandwiches it was meant to because preschool and picnics had been called off. While the bread is not very rainbowy, it would have to do for all of the reasons mentioned above.

A one dish, casserole kind of supper was pretty appealing. I couldn’t think to manage getting more than one thing on the table at the same time. Throwing all of my found, and by found I mean rescued from the depths of the refrigerator, ingredients together seemed like the best thing to do. Adding eggs and cheese, I had a Kabocha and Leek Bread Pudding, fodder for the Februariest of souls.

The kabocha can be replaced by any squash you like or have to hand. I chose this one from our ever-amassing collection because it is so niftily neat and easy to peel. I used some myzithra cheese here but, on a higher energy day, when I felt like leaving the house to get some, I may just have chucked it full of little blobs of goat cheese. You could easily substitute some feta as well.

All of this to say that despite feeling like a small person is sanding away at the inside of my throat, I am now challenged to be as colourful as I can be, in the kitchen anyway. So, thank you Kate for the kick in the pants. Unless, of course, you really were speaking of our decorating aesthetic. In which case, please disregard the above.

Kabocha and Leek Bread Pudding (this should handily feed 8)

4 cups peeled, seeded and cubed squash

2 teaspoons olive oil

3 large leeks washed and sliced (about 2 cups)

1 large onion chopped

3 cloves garlic

2 teaspoons olive oil

5 cups cubed french bread (a round boule, a couple of days old is perfect)

4 green onions chopped

1 cup cream

1 1/2 cup milk

6 eggs

1/2 cup myzithra cheese grated

1/2 teaspoon salt and fresh ground black pepper to taste

Butter a large baking dish.

Preheat oven to 350ºF.

Sauté the squash in the first two teaspoons of olive oil over low heat until it is tender. It is packed full of natural sugars, so make sure it doesn’t burn. Browned is okay, burnt is not. Remove from heat.

Sauté the leeks, onions and garlic in the second two teaspoons of olive oil until soft. Remove from heat.

In a mixing bowl, whisk together the cream, milk, eggs and salt and pepper.

In the baking dish, mix together the bread, squash, leek mixture, green onions, cheese and egg mixture. Press the bread down a bit to make sure everything is soaked with the egg mixture.

Bake for 40 minutes.

Enjoy with some sautéed greens or salad or, if you must, some bacon.

Monday
Dec272010

Pre-Resolution Pennies

A few days ago, I found myself channeling my inner 1950’s housewife, the one with the perfectly starched, immaculately clean apron and not a hair out of place. Not the one I more closely resemble, with no apron and floury wet handprints on my butt - the result of a misplaced towel, and hair that resembles that Hallowe’en wig in the bottom of your dress up trunk but with the added dimension of whatever your child ate for breakfast smeared on one side and toothpaste in the ends of the other. It’s a glamorous job I do.

I was tidying up the cheese drawer, trying to make some space for all the cheese we need to have for Christmas. There was a chunk of prematurely purchased Christmas stilton that needed using up and, maybe it is because I have been trying to be so good and not eat such things lately, the thought of the best way to make cheese more fattening came to mind. I needed to make cheese pennies. You know, the ones you have eaten at least a dozen of before you can say, ‘A moment on the lips...‘. 

Ours would be stilton cheese pennies and we would throw some nuts in and then they would be very delicious with some port, the port you need to have because it is Christmas. You know, to go with all the cheese.

It’s not a new idea. It has been done way more than once, usually called Stilton Shortbread or Stilton and Walnut Cheese Dubloons or something else to make them sound all fancy. And, even though they are but humble cheese pennies, I can see why people try to give them this exalted status with flowery names. They certainly didn’t make it to Christmas Day here.

I managed to save enough to include in our Christmas goodie bags we were making for some friends but the daughters ran off into a corner with a handful nicked off the cooling rack. Stephen then discovered the container I had carefully hidden them in after a bike ride home but before supper. It took all three of us to tear them out of his hands which ended in hysterics because the girls thought they were rescuing the pennies for their own consumption. 

I didn’t use any dry mustard or cayenne which the cheddar variety like. I did use a healthy dose of fresh ground black pepper which when baked just added a toasty little kick. The pecans add a really great crunch to the pennies.

These are really good to make in advance. You can leave the dough in the fridge and just slice and bake before you need them. They also keep very well in an airtight container at room temperature after baking.

You really need these. Maybe as a foil to your New Year’s Eve tipple. I encourage you to enjoy them soon, before all your resolutions kick in and you can’t.

Stilton and Pecan Pennies

1 generous cup crumbled stilton

1/2 cup butter (if you use salted, don’t add salt, if you use unsalted, add the salt)

2 cups all purpose flour

1/2 cup chopped pecans

1/4 teaspoon salt

Fresh ground black pepper to taste

Mix all the ingredients together and add cold water by the tablespoonful until the dough just holds together (I used 2 tablespoons).

Divide the dough in two. Roll each half into a log about 1-inch in diameter and wrap in clingfilm. Chill for at least a couple of hours.  

Preheat oven to 400ºF.

Slice in 1/4-inch rounds and arrange on a parchment lined baking sheet. Bake for about 12 minutes or until they are golden on the bottoms and edges.

Cool and try not to eat all at once.

Monday
Nov222010

Cheddar and Chive Buttermilk Biscuits

Until recently, I had never been to a Target. I had heard all about it. I had read about it, David Lebovitz misses it throughout The Sweet Life in Paris. I had dreamt about it. Well, I had daydreamed about it - casually strolling through the aisles, neatly placing things in a basket, maybe trying on a few bargain items of clothing before heading to the check out where the cashier looks at me with a look that says,‘there is a woman who has her shit together.’ Then, reality seeps back in and the daydream becomes a daymare - shopping trolley careening through the aisles with one child hanging off the side wailing because I won’t buy her some Polly Pockets while the other child squeals in discomfort at the seat belt she is trying to escape from, random items are being thrown in, there is at least one open box of crackers or cereal administered as a failing bribe for peace, there is no patience for a leisurely fitting and the cashier’s look says,‘Bloody hell, why do I have to get all the nut job mothers who think shopping with their children is acceptable?’

When we got here, to San Diego, I even looked the address of all the Targets up, knowing that one day, my time would come. But, I resisted the urge to cart the girls off there. I insisted that I would not go until there was something we needed. We would not go and aimlessly ogle all the things we didn’t need to buy. 

The place where we were staying, before moving to our more permanent semi-permanent home had next to no cooking equipment. By equipment, I don’t mean blenders, food processors and mixers. By equipment, I mean pots and pans and frustrated at not being able to throw away the immense collection of scratched, bent and burnt teflon in the kitchen, I had a crazy thought. We could bake something, we just had to go somewhere and buy some pans. If that somewhere happened to be Target, well then our first trip there ever had just found its purpose.

Poppy and I decided we would make some biscuits so we googled around for a recipe and found a Fine Cooking recipe that worked out just fine.


I followed the recipe pretty closely, even down to kneading the dough a dozen times. I did exactly twelve and took a photo every three kneads. I don’t think my camera will ever forgive me.


I doubled the recipe, thinking that a single batch’s 9 biscuits might not be enough. Then, I had a little math mishap and we wound up with 36 smallish biscuits instead of 18 big ones. Regardless, they were fluffy and flaky and disappeared very quickly, all 36 of them. And, even though they are full of butter and cheese, we couldn't help but spread a little more butter on the hot ones.

Cheddar and Chive Buttermilk Biscuits from Fine Cooking Magazine

2 cups unbleached all-purpose flour

2 teaspoons baking powder

1/2 teaspoon baking soda

1/2 teaspoon salt

1/2 cup cold butter, cut into 1/2-inch cubes

1/4 cup chives finely chopped

3/4 cup grated old Cheddar

2/3 cup  buttermilk

Preheat oven to 375ºF.

In a large bowl mix flour, baking powder, baking soda, and salt. 

Rub the butter in until the mixture has small pea sized pieces. 

Mix in the chives and cheddar.

Stir in the milk until the dough just starts to come together.

Turn out onto the clean work surface and knead twelve times, exactly.

Pat the dough into a 1-inch thick square and trim a thin slice off the edges. This will help the biscuits rise. You can use this for a couple of less pretty biscuits.


Cut the dough into nine biscuits and place them on a parchment lined baking sheet.

Bake for about twenty minutes, or golden brown.

Enjoy.

Tuesday
Oct122010

What? Cauliflower Cake?

I discovered this while I was catching up on some posts from the Guardian food section one night. I should have been sleeping but it seemed such a shame to let all that peace and quiet and perfectly good reading time go to waste. I wound up reading it and thought I would file it away, by file I mean forget about in my ‘spirited’ daughter addled brain, for supper some day.


Turns out, some day came sooner than I thought. It came in the form of our say-goodbye-to-my-beautiful-bamboo-counterscape dinner rolled into a last-big-gong-show-before-we-leave-all-of-our-friends-for-six-months dinner. It also came because I needed something to sop up the beef and chestnut and the spicy butternut and lentil stew juices.

Because I am trying to empty the cupboards before we go seasonless in CA, and I will be countertopless for the rest of the week, I didn’t want to wind up with any leftovers. I wanted something a little different though and I remembered, miraculously enough, that I had seen this cauliflower cake thingy somewhere. After a mildly frenzied interweb look around, I found it or remembered where it was. 

I was alarmed that it asked for 10 eggs. I needed to make two and I had exactly four eggs in the house. I had decided that this was what we were having for supper though and continued some by-now-not-so-mildly frenzied (Little Daughter was underfoot and Big Daughter’s return from a friend’s house was imminent) interweb search until I found something the contents of my cupboards and fridge could cope with.

I was not skeptical, Big Daughter was when she got wind of what was going on. The recipe struck me as a little bland but I had remedied that, I hoped, with the addition of more cheese than it called for, a lot of grainy mustard and some finely sliced onion.

Turns out, Big Daughter changed her tune. It is pretty delicious. It has a really great texture like a cross between cake and fritatta but the ground almonds keep it from getting gummy.

I used some 2 year old cheddar because let’s face it, cauliflower and cheddar cheese were pretty much made for each other. I used Kozlik’s Double C mustard but any good grainy mustard would be fine.

I doubled the original recipe, which was lucky, because breakfast was ready for the next day. I even cooked bacon to go with it - big brownie points with Big Daughter. She was putty in my hands for all of about forty-two seconds.

Which leads me to what I may do next time, not that this isn’t really delicious as it is. I keep thinking about roasting the cauliflower with caraway seeds and adding sauteed onion to the batter. I also think that some lardons, that’s bacon bits in English, as Croque-Camille forgets in the recipe I started from, would also make it kind of perfectly meal-like.

Cauliflower Cake adapted from Chou-Fleur de Bretagne by Croque-Camille

1 head cauliflower

2 cups grated old cheddar cheese

4 eggs

1/3 cup + 1 tablespoon + 1 teaspoon olive oil (plus some for roasting the cauliflower)

2 tablespoons grainy mustard 

1 cup flour

1 tablespoon baking powder

1 1/4 cup almond meal

1/2 teaspoon salt (plus a little for roasting the cauliflower)

Freshly ground black pepper

1/2 cup milk

Thinly sliced onion rings

Preheat oven to 350º.

Break the cauliflower into florets and put it on a baking sheet. Drizzle with olive oil and sprinkle with salt and pepper and toss. Put it in the oven and roast, tossing once or twice, for about twenty minutes or until cauliflower is tender and starting to brown.

Oil two 8-inch round cake tins.

Whisk the eggs, olive oil and mustard together in a large bowl.


In a separate bowl, mix the flour, baking powder, almond meal, salt and some pepper.

Add half the milk to the eggs, then half the flour mixture, half the milk and the remaining flour, thoroughly mixing between each addition.


Fold in the cauliflower and cheese. 

Pour into the baking pans and top with the onion slices.

Bake for 35 minutes.

Remove from oven and cool on a rack for a few minutes. Loosen edges from pan and carefully remove the cake from the pan and serve in wedges.