Entries in Biscuits (4)

Thursday
Jan262012

Olive Oil Oatcakes or, Four Fleeting Months

September 27, 2011. I could have sworn I had been here more recently than that. But, no. Aside from swooping in from time to time and deleting spam and checking to see if anyone had commented on any ancient posts, I have been gone. 

I was around for a spell, setting up a still dark, still unfinished crafty page. It has promise. Autumn was full of craftiness - lots of sewing and gluing and feeling very homemade. There was not very much cooking, not much to write about. The adjustment to my daughter’s new school and extra-curricular life kicked me in the gut. That, and trying to be serious about shifting the extra twenty pounds that has been hanging around for nearly six years meant that cooking anything that wasn’t child-friendly or low in calories, carbohydrates, fat and sugar was clearly not a priority. 

I also discovered Downton Abbey. I know it really is no excuse as it only accounts for a few too short hours of the last four months (Yep, four months, I know). It is, however, very hard to not stand watching, wondering whether an extra or secret episode has unexpectedly downloaded in the twenty-six minutes since I last checked. It’s become a little consuming.

Selflessly though, here I am. Back, with something healthy and cupboard friendly and good for you and your offspring to eat without feeling like you have broken the calorie bank. I have made these oatcakes at least half a dozen times during my hiatus, each time a little different with various additions and subtractions. I have got it down though and after some alterations felt at liberty to share with you my take on an already great recipe.

Hugh Fearnley-Whittingstall, the master of all things head to tail and local and ethical and sustainable and well, you know where I am going, writes a column for The Guardian. In it, he talks of all manner of foodly things from pig's cheeks to sumac to steamed pudding to picnics. I appreciate what he does. I adapted one of those recipes from an article on biscuits to suit not only the tastes of my children but our pantry contents as well.

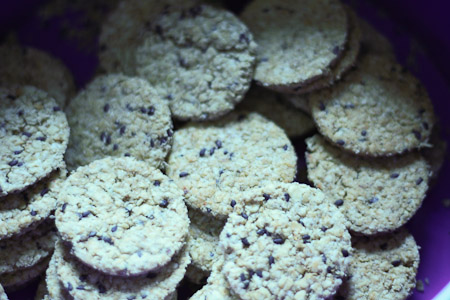
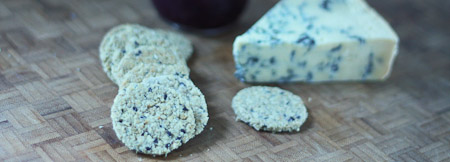
I spent time grinding rolled oats and pinhead oats and steel cut oats and trying to get the texture just right before I even tried it with just plain old rolled oats, unground, as they come. Turns out, I could have saved a lot of time and good, but not excellent, batches of these little cheese, jam, chutney, salmon, ham and anything else you could think to put on a cracker holders. Plain old rolled oats is the way forward as far as I am are concerned. The finished texture may rival some of the finest Scottish offerings and it was by far the easiest batch to deal with in the prep.

The original recipe suggests letting the dough rest for as long as it takes to open a bottle of wine and pour yourself a glass. I can assure you that if it rests for as long as it takes to drink that glass of wine it will not result in culinary ruin. You may have to add a touch more water and give it a slightly longer bake but it will be just as good, and maybe even a little crunchier.

As well as changing the oats, I may have added a touch more water than what Hugh recommends. He says sunflower seeds, I say use whatever takes your fancy, or you have in your cupboard. I have used nigella seeds, sesame seeds, poppy seeds, a mix of seeds and nothing. All have turned out just fine. The nigella are the prettiest and the plain ones are the most perfect oaty toastiness.

Olive Oil Oatcakes (adapted from Hugh Fearnley-Whittingstall’s Bill Rona’s Oatcakes recipe)

280 grams rolled oats

Cracked black pepper (Hugh recommends 10 twists, I think you can take it or leave it)

1/2 teaspoon salt

A small handful of seeds

75 ml extra virgin olive oil

Preheat the oven to 350ºF. Dust two baking sheets with flour. Boil the kettle.

Mix the dry ingredients. Stir in the olive oil. Make a well in the centre of the mixture. Add just enough boiling water to bring the dough together. You want the dough to be firm, not sticky.

Form the dough into a ball and allow to rest for a few minutes.

Roll out the dough on a floured surface to about 3mm thick. Cut into rounds, you will need to use a fairly sharp cutter, or using a sharp knife, cut into squares.

Place on baking sheets and bake for twenty minutes. Remove from the oven, turn oatcakes over and bake a further 5-10 minutes.

Remove from oven and cool.

Yield will depend on cutter size and shape but expect about 3 dozen 1 3/4-inch round biscuits.


Tuesday
Mar222011

Cornmeal Biscuits or, My Story of Late

Last week, I was bemoaning my recent lack of kitchen enthusiasm. I had made some biscuits, but I didn’t want to post about it because I had posted some other biscuits not so long ago. Then, today, the girls and I made some more biscuits, because we love them and Cook’s Illustrated said they were really good, so we had to. The whole time I was thinking that I should be making something I could write about without making you all think we eat nothing but butter and flour with a bit of stuff to hold it together.

Then, I started thinking about what Denae at The Back Ordered Life said on the weekend. She said you should always write about what you know, you should write your story. And, while I know that I am using this pretty literally, right now I know all about biscuits. All sorts of biscuits, all sorts of fluffy, light and airy little puffs of buttery carb. They are a part of my story. If you make these, they could be part of your story. And, a fine story it will be.

I rarely happen upon a cornmeal based recipe I think I would enjoy. I am not a cornbread lover, most are too sweet. For the same sugary reason, I don’t care for cornmeal muffins. If something looks savoury enough, I may give it a go, but usually not to wind up raving about it. This little number from Cook's Illustrated looked just like the thing I needed to change my mind about cornmeal bakery plus, they are biscuits.

It was raining here. In the rest of the world, one would put on a slicker and brave the elements. This is Southern California, and I was doing like the locals do and chose to act as though a category three hurricane was upon us. Or, you could argue, I had found the perfect excuse to stay in my pyjamas and not brush my hair, let alone actually get in the shower.

All this to say that the recipe calls for buttermilk, I didn’t have any and, although the nearest shop is 100 metres away, I wasn’t going there. I used the old tablespoon of lemon juice in the milk trick and it seems to have worked a treat.

The good person at Cook’s Illustrated, Cali Rich, says to knead the biscuit dough 8-10 times before patting it out. I did not do this, which was fine. However, I did notice that those last biscuits that I cut from the scraps that were smushed back together in a kneadish kind of manner were a little fluffier than the ones cut from the unsmushed dough. So, if you want to knead your dough a few times, I think it would be a good thing. If, like me today, you can’t spare the extra nine seconds it will take, then don’t knead. I leave it up to you.

The other thing the girls and I discovered about these little lovelies I was planning on having for supper is that warm from the oven and drizzled with honey, it is almost impossible not to want to make these a frequent part of your breakfast, lunch and tea time story.

Cornmeal Biscuits adapted from Spring Entertaining from Cook’s Illustrated (makes 12)

1 1/4 cups whole milk

1 tablespoon lemon juice

1 cup cornmeal (avoid coarsely ground)

1 tablespoon honey

2 cups all purpose flour

1 tablespoon baking powder

1/2 teaspoon salt

1/2 teaspoon baking soda

12 tablespoons (3/4 cup) cold salted butter cut into 1/2-inch pieces

Preheat oven to 450º.

Whisk milk and lemon juice together in a large bowl. Let stand until thickened, about ten minutes. Add honey and cornmeal, whisk together. Let stand ten minutes again.

In the bowl of a food processor add flour, baking powder, salt, baking soda and pulse to combine. Add butter and pulse until the mixture resembles coarse crumbs. 


Add the flour mixture to the cornmeal mixture. Stir until a dough forms.

Turn out onto a lightly floured surface and if you are kneading, knead. Otherwise, pat dough out to about 3/4-inch thickness. Cut into 2 1/2-inch rounds with a cutter or a floured glass or cup. Place on baking sheet.

Bake for 5 minutes, reduce heat to 400º and bake for a further 8-10 minutes.

Let cool for a few minutes on baking sheet before you devour them all.


Monday
Dec272010

Pre-Resolution Pennies

A few days ago, I found myself channeling my inner 1950’s housewife, the one with the perfectly starched, immaculately clean apron and not a hair out of place. Not the one I more closely resemble, with no apron and floury wet handprints on my butt - the result of a misplaced towel, and hair that resembles that Hallowe’en wig in the bottom of your dress up trunk but with the added dimension of whatever your child ate for breakfast smeared on one side and toothpaste in the ends of the other. It’s a glamorous job I do.

I was tidying up the cheese drawer, trying to make some space for all the cheese we need to have for Christmas. There was a chunk of prematurely purchased Christmas stilton that needed using up and, maybe it is because I have been trying to be so good and not eat such things lately, the thought of the best way to make cheese more fattening came to mind. I needed to make cheese pennies. You know, the ones you have eaten at least a dozen of before you can say, ‘A moment on the lips...‘. 

Ours would be stilton cheese pennies and we would throw some nuts in and then they would be very delicious with some port, the port you need to have because it is Christmas. You know, to go with all the cheese.

It’s not a new idea. It has been done way more than once, usually called Stilton Shortbread or Stilton and Walnut Cheese Dubloons or something else to make them sound all fancy. And, even though they are but humble cheese pennies, I can see why people try to give them this exalted status with flowery names. They certainly didn’t make it to Christmas Day here.

I managed to save enough to include in our Christmas goodie bags we were making for some friends but the daughters ran off into a corner with a handful nicked off the cooling rack. Stephen then discovered the container I had carefully hidden them in after a bike ride home but before supper. It took all three of us to tear them out of his hands which ended in hysterics because the girls thought they were rescuing the pennies for their own consumption. 

I didn’t use any dry mustard or cayenne which the cheddar variety like. I did use a healthy dose of fresh ground black pepper which when baked just added a toasty little kick. The pecans add a really great crunch to the pennies.

These are really good to make in advance. You can leave the dough in the fridge and just slice and bake before you need them. They also keep very well in an airtight container at room temperature after baking.

You really need these. Maybe as a foil to your New Year’s Eve tipple. I encourage you to enjoy them soon, before all your resolutions kick in and you can’t.

Stilton and Pecan Pennies

1 generous cup crumbled stilton

1/2 cup butter (if you use salted, don’t add salt, if you use unsalted, add the salt)

2 cups all purpose flour

1/2 cup chopped pecans

1/4 teaspoon salt

Fresh ground black pepper to taste

Mix all the ingredients together and add cold water by the tablespoonful until the dough just holds together (I used 2 tablespoons).

Divide the dough in two. Roll each half into a log about 1-inch in diameter and wrap in clingfilm. Chill for at least a couple of hours.  

Preheat oven to 400ºF.

Slice in 1/4-inch rounds and arrange on a parchment lined baking sheet. Bake for about 12 minutes or until they are golden on the bottoms and edges.

Cool and try not to eat all at once.

Monday
Nov222010

Cheddar and Chive Buttermilk Biscuits

Until recently, I had never been to a Target. I had heard all about it. I had read about it, David Lebovitz misses it throughout The Sweet Life in Paris. I had dreamt about it. Well, I had daydreamed about it - casually strolling through the aisles, neatly placing things in a basket, maybe trying on a few bargain items of clothing before heading to the check out where the cashier looks at me with a look that says,‘there is a woman who has her shit together.’ Then, reality seeps back in and the daydream becomes a daymare - shopping trolley careening through the aisles with one child hanging off the side wailing because I won’t buy her some Polly Pockets while the other child squeals in discomfort at the seat belt she is trying to escape from, random items are being thrown in, there is at least one open box of crackers or cereal administered as a failing bribe for peace, there is no patience for a leisurely fitting and the cashier’s look says,‘Bloody hell, why do I have to get all the nut job mothers who think shopping with their children is acceptable?’

When we got here, to San Diego, I even looked the address of all the Targets up, knowing that one day, my time would come. But, I resisted the urge to cart the girls off there. I insisted that I would not go until there was something we needed. We would not go and aimlessly ogle all the things we didn’t need to buy. 

The place where we were staying, before moving to our more permanent semi-permanent home had next to no cooking equipment. By equipment, I don’t mean blenders, food processors and mixers. By equipment, I mean pots and pans and frustrated at not being able to throw away the immense collection of scratched, bent and burnt teflon in the kitchen, I had a crazy thought. We could bake something, we just had to go somewhere and buy some pans. If that somewhere happened to be Target, well then our first trip there ever had just found its purpose.

Poppy and I decided we would make some biscuits so we googled around for a recipe and found a Fine Cooking recipe that worked out just fine.


I followed the recipe pretty closely, even down to kneading the dough a dozen times. I did exactly twelve and took a photo every three kneads. I don’t think my camera will ever forgive me.


I doubled the recipe, thinking that a single batch’s 9 biscuits might not be enough. Then, I had a little math mishap and we wound up with 36 smallish biscuits instead of 18 big ones. Regardless, they were fluffy and flaky and disappeared very quickly, all 36 of them. And, even though they are full of butter and cheese, we couldn't help but spread a little more butter on the hot ones.

Cheddar and Chive Buttermilk Biscuits from Fine Cooking Magazine

2 cups unbleached all-purpose flour

2 teaspoons baking powder

1/2 teaspoon baking soda

1/2 teaspoon salt

1/2 cup cold butter, cut into 1/2-inch cubes

1/4 cup chives finely chopped

3/4 cup grated old Cheddar

2/3 cup  buttermilk

Preheat oven to 375ºF.

In a large bowl mix flour, baking powder, baking soda, and salt. 

Rub the butter in until the mixture has small pea sized pieces. 

Mix in the chives and cheddar.

Stir in the milk until the dough just starts to come together.

Turn out onto the clean work surface and knead twelve times, exactly.

Pat the dough into a 1-inch thick square and trim a thin slice off the edges. This will help the biscuits rise. You can use this for a couple of less pretty biscuits.


Cut the dough into nine biscuits and place them on a parchment lined baking sheet.

Bake for about twenty minutes, or golden brown.

Enjoy.