Entries in Grains (6)

Thursday
Jan262012

Olive Oil Oatcakes or, Four Fleeting Months

September 27, 2011. I could have sworn I had been here more recently than that. But, no. Aside from swooping in from time to time and deleting spam and checking to see if anyone had commented on any ancient posts, I have been gone. 

I was around for a spell, setting up a still dark, still unfinished crafty page. It has promise. Autumn was full of craftiness - lots of sewing and gluing and feeling very homemade. There was not very much cooking, not much to write about. The adjustment to my daughter’s new school and extra-curricular life kicked me in the gut. That, and trying to be serious about shifting the extra twenty pounds that has been hanging around for nearly six years meant that cooking anything that wasn’t child-friendly or low in calories, carbohydrates, fat and sugar was clearly not a priority. 

I also discovered Downton Abbey. I know it really is no excuse as it only accounts for a few too short hours of the last four months (Yep, four months, I know). It is, however, very hard to not stand watching, wondering whether an extra or secret episode has unexpectedly downloaded in the twenty-six minutes since I last checked. It’s become a little consuming.

Selflessly though, here I am. Back, with something healthy and cupboard friendly and good for you and your offspring to eat without feeling like you have broken the calorie bank. I have made these oatcakes at least half a dozen times during my hiatus, each time a little different with various additions and subtractions. I have got it down though and after some alterations felt at liberty to share with you my take on an already great recipe.

Hugh Fearnley-Whittingstall, the master of all things head to tail and local and ethical and sustainable and well, you know where I am going, writes a column for The Guardian. In it, he talks of all manner of foodly things from pig's cheeks to sumac to steamed pudding to picnics. I appreciate what he does. I adapted one of those recipes from an article on biscuits to suit not only the tastes of my children but our pantry contents as well.

I spent time grinding rolled oats and pinhead oats and steel cut oats and trying to get the texture just right before I even tried it with just plain old rolled oats, unground, as they come. Turns out, I could have saved a lot of time and good, but not excellent, batches of these little cheese, jam, chutney, salmon, ham and anything else you could think to put on a cracker holders. Plain old rolled oats is the way forward as far as I am are concerned. The finished texture may rival some of the finest Scottish offerings and it was by far the easiest batch to deal with in the prep.
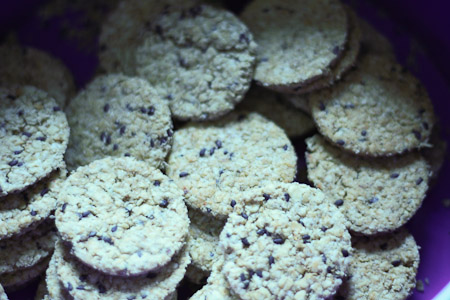
The original recipe suggests letting the dough rest for as long as it takes to open a bottle of wine and pour yourself a glass. I can assure you that if it rests for as long as it takes to drink that glass of wine it will not result in culinary ruin. You may have to add a touch more water and give it a slightly longer bake but it will be just as good, and maybe even a little crunchier.

As well as changing the oats, I may have added a touch more water than what Hugh recommends. He says sunflower seeds, I say use whatever takes your fancy, or you have in your cupboard. I have used nigella seeds, sesame seeds, poppy seeds, a mix of seeds and nothing. All have turned out just fine. The nigella are the prettiest and the plain ones are the most perfect oaty toastiness.
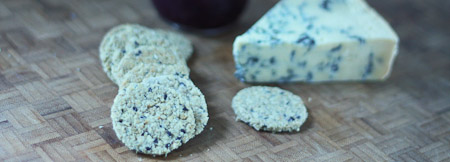
Olive Oil Oatcakes (adapted from Hugh Fearnley-Whittingstall’s Bill Rona’s Oatcakes recipe)

280 grams rolled oats

Cracked black pepper (Hugh recommends 10 twists, I think you can take it or leave it)

1/2 teaspoon salt

A small handful of seeds

75 ml extra virgin olive oil

Preheat the oven to 350ºF. Dust two baking sheets with flour. Boil the kettle.

Mix the dry ingredients. Stir in the olive oil. Make a well in the centre of the mixture. Add just enough boiling water to bring the dough together. You want the dough to be firm, not sticky.

Form the dough into a ball and allow to rest for a few minutes.

Roll out the dough on a floured surface to about 3mm thick. Cut into rounds, you will need to use a fairly sharp cutter, or using a sharp knife, cut into squares.

Place on baking sheets and bake for twenty minutes. Remove from the oven, turn oatcakes over and bake a further 5-10 minutes.

Remove from oven and cool.

Yield will depend on cutter size and shape but expect about 3 dozen 1 3/4-inch round biscuits.


Wednesday
Jun082011

Seeded Brown Irish Soda Bread

While at work, my husband has the privilege of being cooked for and cleaned up after. There is a lovely Irish girl who keeps him from withering away. Her name is Janine.

From time to time, the girls and I are lucky enough to share the privilege with him. Janine puts up with my children under foot and the forty-six questions that get fired at her about exactly what ingredients are going where and why the stove moves and why the fridge doors are so heavy and why the galley is called the galley and how come she has to cook for the boys and why the bread needs to cook for an hour and why she chose to paint her toenails that colour and if she is going to wear a pretty dress later on and well, you get the idea. She not only puts up with them, she does so patiently and calmly and sweetly in moments when I would have lost any shred of cool I may possess by question four.

She made us some soda bread for lunch one day. Poppy and I decided we would try and reproduce her delicious loaf. We tried and it was good but I am thinking it may need an Irish hand to be as delicious as hers was. For the rest of us this will do just fine to be sure.

I toasted the sesame seeds and pine nuts and cooled them before adding because they taste even better that way.  The seed/nut combination is up to you. You could add pumpkin seeds or chopped nuts or whatever you feel like.

Don’t forget to cut a cross in the top which is not a religious symbol - I had thought it was. Janine says it just helps it rise evenly.

Seeded Brown Irish Soda Bread (adapted from Janine’s adaptation of Rachel Allen’s Brown Soda Bread in Bake)

225 grams (8 ounces) whole wheat flour

225 grams (8 ounces) all purpose flour

1 teaspoon salt

1 teaspoon baking soda

100 grams mixed seeds (I used sunflower, poppy, pine nuts and sesame seeds)

25 grams (1 ounce) butter

1 egg beaten

375-400 mL buttermilk

Preheat oven to 425º (220ºc). 

Mix all the dry ingredients together in a large bowl. Rub the butter in to the dry ingredients. Make a well in the center.

Whisk the egg and buttermilk together and pour most of the liquid into the dry ingredients. Using your hand like a scoop, bring the flour and liquid together, adding more liquid if necessary. The dough should be soft an not too sticky.


Turn out and bring dough into a round on a parchment lined baking sheet.

Cut a deep cross in the top of round.

Bake for 15 minutes. Turn heat down to about 390º (200ºc) and bake for another 30 minutes. The loaf will sound hollow when it is done.

Remove from oven and allow to cool.


Wednesday
Jun082011

Toasted Fregola and Tomatoes

Shortly before we left San Diego, I discovered the wonders of Little Italy. I knew it was there and had briefly strolled down India Street but, with two hooligan girls in tow, you don’t go in to shops. 

The farmers’ market on Saturday was incredible and, if we hadn’t had the Hillcrest Market around the corner, I would have made more trips to Little Italy on Saturdays. Sadly, Stephen is a less then avid market goer, and I can’t bring myself to cajole him into going on his all too short weekends.

Finally though, taunted by the sight of fresh pastas and cheeses and all the way from Italy dry goods, I started taking my bribed-into-good-behaviour girls into the little shops and our grocery bill took a little leap.

The Sardinians make a type of couscous called fregola. It is usually shaped like Israeli couscous but is toasted. Sometimes it is a little rougher in texture which, I think, is great as it holds any sauce better. It is available at any good Italian market and best of all, there are often recipes like this one on the back of the packet.


Like all good Italian cooking, this is about simplicity and excellent ingredients. It is a great step away from the spaghetti rut. The fact that it is toasted lends a little toasty nuttiness and depth but not so obvious that your children are going to turn their noses up.

I used tinned cherry tomatoes for this. I was lucky enough to find them. I would recommend using diced tinned tomatoes but try and use the best you can afford, and try for San Marzano if you can find them, you will be happy you did. If tomatoes are in season, you could use chopped fresh but you may need some extra stock. I would also suggest that you use a fairly large pan, otherwise you will stir and wind up with something like this.

Toasted Fregola with Tomatoes (adapted from the back of the packet)

1 large onion finely chopped

4 large cloves garlic minced

250 grams toasted fregola

3 tablespoons olive oil

4 cups stock (I used chicken, you can use vegetable)

1 large (28 ounce) tin tomatoes

Chopped fresh parsley

Basil pesto to serve (if desired)

Salt and pepper to taste

Sauté onions and garlic with olive oil in a large pan. 

Add tomatoes and stock and bring to a boil.

Stir in fregola and return to boil. Reduce heat and simmer for 15-20 minutes or until the desired tenderness is reached.

Stir in some chopped parsley and season to taste.

Serve with a drizzle of pesto or extra virgin olive oil or some shaved parmesan.

Saturday
May212011

No Knead Olive Oil Pizza Dough - Kitchen Workhorse

Sometimes you happen upon something that makes your previous efforts seem like a colossal waste of effort. Years spent altering a bit of this and a bit of that, wondering which combination will be just right are looked back on as misguided and foolhardy. Now, I do know that life, and all it entails are about the journey, not about where you end up but, I have decided, that as far as pizza crust goes, we have arrived and reflection on the past will not be happening.

I have had a pretty decent pizza dough recipe that I have used for about twelve years. It makes a divine focaccia, which is really all about the olive oil and salt ratio. The pizza crust it makes, if your oven is hot enough and you are lucky enough to be using “00” flour, is pretty good. I have spent many hours kneading this dough, in all its flour combinations, trying to come out with just the right taste and bite. Rarely with overwhelming success and, when successful, rarely repeatable which I chalk up to our nomadic tendencies.

I like kneading bread, I love it in fact. I love it more when I have no one underfoot and something good to listen to, and by good I don’t mean Sharon, Lois and Bram. Under these circumstances, I don’t even mind the clean-up. It used to be a retreat, the morning bread making, hiding out in the galley before anyone woke and broke the silence. Sadly, or happily, these circumstances are pretty much a thing of the past and I look to simplifying, even if it means giving up on cheap therapy.

When I saw this recipe and heard about the the book it came from, Artisan Bread in Five Minutes a Day, like my friend Kate when I told her about it, said, ‘I don’t believe it.’ I still haven’t read the book but if this pizza crust recipe is anything to go by, it holds great promise.

I have made it with several different types of flour, all resounding successes. Our favourite is making it with all Speerville Mills Whole White flour. It has a great crunch and a nice toastiness on the crispier bits. The half white bread flour, half whole wheat was really good too. I wouldn’t go more than 50% whole wheat personally but to each his own.

I know what I am about to say will leave pizza purists reeling. Don't get me wrong. I love perfect pizza. I have been lucky enough eat it here and here and here repeatedly (I apologize for the music). I spent four months working in and out of Naples and when in Rome, er, I mean Naples, you do as the Neapolitans do. I also think that when you are not in Naples and you don't have a 200 year old oven or family tradition to carry on, you can use a little license.

We have been topping pizzas with everything and have discovered fruit pizzas. The first was a caramelized shallot, fresh mango and brie number with a bit of fresh chive that was scrummy. The next, a few days later, was the same caramelized shallots, apple and cheddar and I think I almost liked it better simply because the apples held a slight crunch.

The girls are loving their pizza bianca. Our version is a smear of garlic scape pesto with feta or cheddar. It’s also so good with spinach and artichokes.

While we haven’t been, and don’t, eat pizza everyday, this dough is great because a batch makes enough for about five or six thin crust pizzas. You can divide it after it rises and put it in bags in the fridge for up to twelve days. I am sure it would freeze really well but, I have to admit, we haven’t had to yet.

Tell me, what is your favourite pizza topping. Are you a traditionalist? Can you stomach pineapple? What’s your most adventurous?

Olive Oil Dough from Artisan Bread in Five Minutes a Day

Makes enough for five to six thin crust pizzas (about 4 pounds of dough)

2 3/4 cups warm water

1 1/2 tablespoons active dry yeast

1 1/2 tablespoons salt

1 tablespoon sugar

1/4 cup extra virgin olive oil

6 1/2 cups flour (be adventurous)

In the bowl of a stand mixer, if you have one, or a large mixing bowl, mix the water, yeast, salt, sugar and olive oil together.

Mix in the flour until it all comes together.

Turn into a large bowl and cover, I use cling film because I know it will reach the top of my bowl. If your bowl is big enough, use a damp tea towel.

Let rise at room temperature until it falls back on itself (it rise so much that the bubbles burst and it collapses), or until it flattens on top.

Use immediately or divide, if you want, and refrigerate for up to twelve days, or freeze.

If you freeze it, although I haven’t tried, thaw it in the fridge without opening the bag or container.

Prepare it as you would your usual pizza.

Sunday
Jan092011

Good Luck Lentils

It’s the New Year. I was thinking all about how well it was going. There were lots of happy, uplifting stories like this and this and this. I was smiling.

Then this happened, which infuriated me in the it is easier to buy a gun and ammunition than it is to buy beer kind of way. Later on, I watched this and I thought the world is really, seriously going to hell in a hand basket and what happened to Happy New Year and all that.

It is a few days, alright nine or so, past New Year’s Day but I turned the clock back at our house and we are going to eat lentils, lots of them.

Italians eat lentils on New Year’s day and in the new year. They eat them in hopes of money and good fortune. And let’s face it, the money sure would be nice but the good fortune part? It’s essential.

Good Luck Lentils with Fennel and Chard

1 large onion, finely chopped

5 large cloves garlic minced

Fennel - I had five sweet little bulbs - you should have about 1 cup chopped stalks and 1 cup julienned bulbs

1 cup diced carrots

1 bunch chard chopped

1 cup lentils- I used De Puy but you can use brown or green. I wouldn't use red though. I was going to use black beluga lentils which are awfully pretty but not always to hand.

3 tablespoons olive oil

3 cups stock (chicken or vegetable)

1 cup halved cherry or grape tomatoes (or diced tomato)

Few sprigs fresh thyme

Salt and fresh ground black pepper

Parmeggiano-reggiano shaved

In a large pot, sauté the onions, garlic, carrots and chopped fennel stocks with the olive oil until the onions are translucent. Stir in the lentils and the thyme.

Add the stock and bring to a boil. Reduce heat and simmer, uncovered, for about 20 minutes, until the lentils are almost tender.

Add the chard and the julienned fennel bulb. Cover and simmer for five minutes. Add the tomato and simmer for another three minutes. Season with salt and pepper.

Serve in bowls with a little drizzle of nice olive oil, some fennel fronds and some shaved parmeggiano. A nice chunk of crusty bread goes well here too.

Happy New Year - again!


Thursday
Sep302010

Put You in Your Place Pilaf

In cooking school, one of the first things you learn about is mise en place. You learn all about a brunoise and a mirepoix and mincing and dicing and julienning. You learn about peeling and boning and filetting and all sorts of helpful techniques that will allow you to do your job in a more efficient, organized and, hopefully, flawless manner.

It is all very important, in a culinary sense, not so much in the getting along in the world sense. It is also widely thought to be mind numbing stupid work -not so creative, very monotonous and very time consuming. Secretly, I have always felt that there is no shame in wanting to julienne tomatoes or mince shallots for hours. I found myself, every now and then, envious of the dishwasher's fifty pound bag of potatoes and paring knife. It puts you in your place. You can think and chop and daydream and peel and pay attention to whatever is on the radio and slice and after, all is right in the world, or at least in your part of it.

The best, and in the weeds, the worst, thing about being alone in your kitchen, or galley, is that you have to do it all. There is no choice, unless you can corral an unsuspecting deckhand or small child into doing it for you when you don't have the time.

There is not a whole lot of mise en place that goes on in our kitchen. Meals are made on the fly with at least one chair getting drug across the kitchen floor on its way to 'help out' and at least two hands tugging at whatever cloth they can grab at knee height and the ever-loudening, 'up, up, up,' coming from the same area. Sometimes I like to pretend that I am more organized and that supper is a cooking-show-fabulous display of ramekins and tiny bowls with perfectly prepared ingredients being effortlessly thrown together to make something superb. I am sadly out of practice and easily distracted so what used to take five minutes now takes almost three full episodes of Pinky Dinky Doo, three, 'take that out of your mouth,' interventions (shoe, china tea pot lid and rubber band), a complete tidy up of all the chalk and the multicoloured drool on the floor from discovering that not one of the colours is delicious to eat, a rescue of the pile of 'precious artworks' being torn into tiny pieces and two trips over the contents of everything thigh level and below in our kitchen.

So, while I like to think that cooking like this is therapy, I am closer to needing therapy if I haven't saved the prep for nap time. It does make the witching hour easier though and supper has uniformly cooked pieces and looks a little prettier when you can manage it and, despite all the distraction, it still feels good to slice and dice and peel and chop everything into little bowls, even if it is in forty-five second intervals.

You can do all the prep work for this ahead of time, or as you go. You can then throw it all together, pop it in the oven and walk away for the better part of an hour.

The barley makes a great change from the usual rice and it is delicious. Little Daughter ate this for about three days. Big Daughter had seconds and asked for more a few days after it was all gone.

This makes enough for two adults and two children with a big salad as a main course. It might serve six people as a side dish and would be just fine with a roast chicken.

Barley Pilaf

1 finely chopped onion (3/4 cup)

1 large carrot finely chopped (1 cup)

2 ribs celery finely chopped (3/4 cup)

1 cup mushrooms finely chopped (1 cup)

1 large clove garlic minced 

2 tablespoons olive oil

1 cup pearl barley

3 cups stock (I used chicken stock because I had it, use whatever you have)

1 bay leaf

1 large sprig fresh thyme

Handful of chopped chives

Salt and pepper to taste


Preheat oven to 350º. Sauté onion, carrot, celery, mushrooms and garlic with olive oil over medium high heat in an oven proof pot with an oven proof lid, stirring occasionally, until onion is translucent. Add barley and reduce heat to medium. Stirring occasionally, let the barley get ever so lightly toasted. Don't let it burn. Add stock, bay leaves and thyme and bring to a boil. Cover the pot and place it in the oven for forty-five minutes. Remove the lid and leave in the oven for fifteen minutes more. Remove from the oven and check the seasoning, stir the chives through and serve.